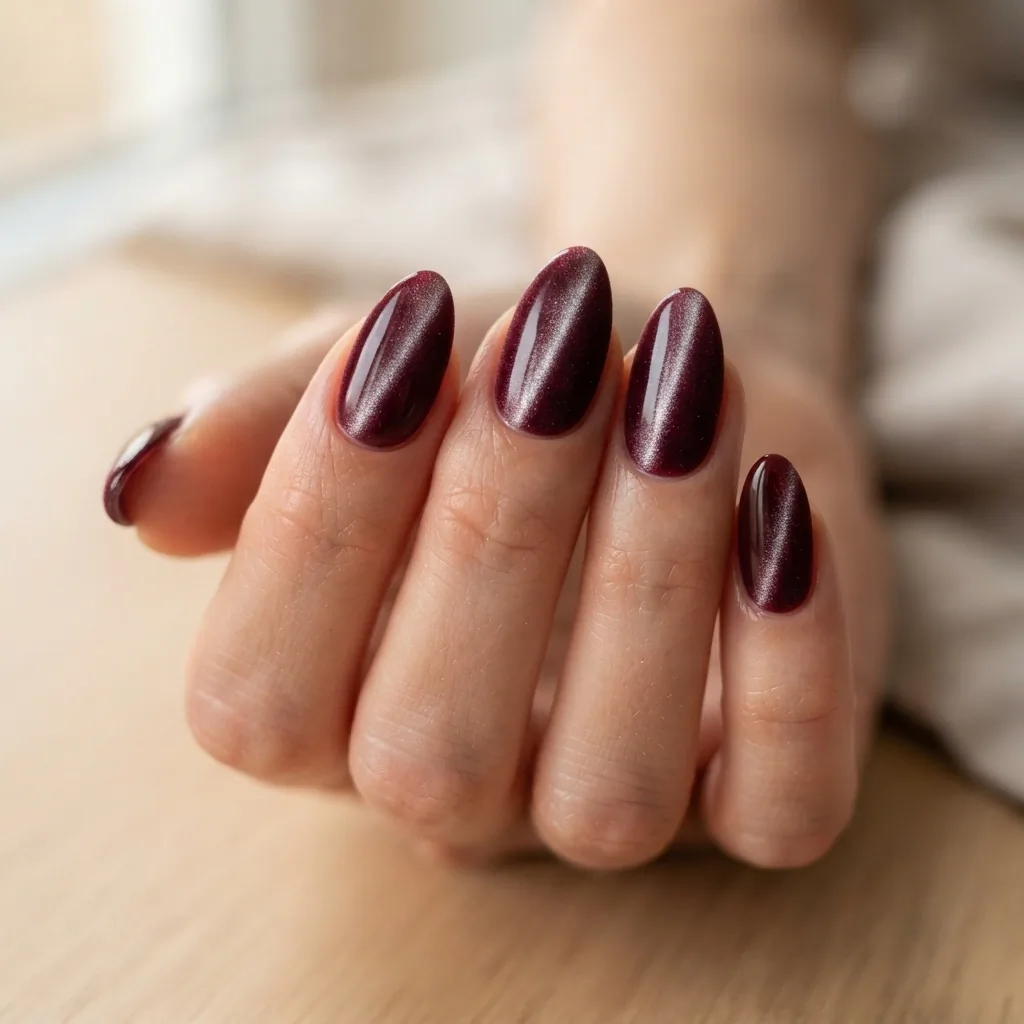
18 Velvet Nail Designs You Can Actually Do at Home
Let me tell you about the first time I saw velvet nails on my feed. I was scrolling in bed, and this deep burgundy manicure caught the light and just, shifted. Like crushed velvet. Like the shimmer was standing up and moving when her hand turned. My first thought was the same one you probably had: “That is gorgeous and there is absolutely no way I could do that.”
Reader, I did it. At my kitchen table. On a weeknight. And if you have met me before, you know my whole nail journey started with a cheap dotting tool during the most boring internship of my life, practicing one wobbly dot at a time. So trust me when I say the velvet look is one of the most forgiving trends out there. The magnet does the artistic part for you. That is not me being nice. That is genuinely how it works.
So grab a coffee. I am going to walk you through what velvet nails actually are, the exact trick that creates that plush shimmer, 18 designs to save and try, how to make them work on short nails and every nail shape, where beginners usually go sideways and how to fix it, and how to take them off later without trashing your natural nails. Pull up a chair. Here we go.
First, what actually makes a nail look like velvet?
Here is the thing that unlocked it for me. There is no fabric involved. Nothing fuzzy. The velvet effect comes from ultra-fine magnetic pigment, basically tiny iron-based particles, suspended in the polish. While that layer is still wet or still uncured, you hover a small magnet over the nail. The particles stand up and gather toward the magnet, and that upright pattern is what catches the light and shifts as your hand moves. Move your hand, the shimmer moves with it.
If the words “cat eye polish” ring a bell, that is the exact same technology. Cat eye pulls the shimmer into one bright stripe. Velvet just spreads that glow across the whole nail. Same magnet, same pigment, different pattern.
You will run into two versions when you shop. Magnetic gel polish needs to be cured under a UV or LED lamp, and it lasts longer, usually a couple of weeks. Air-dry magnetic polish is regular polish that dries in the air with no lamp needed. If the idea of buying a lamp is stressing you out, start with air-dry. You still get the velvet effect. It just wears more like a normal polish. I will flag which designs work best with which, as we go.
The one trick that does 90 percent of the work
Before the designs, learn this, because it is the whole game.
The magnet shape decides your pattern. A straight bar magnet held flat across the nail creates a soft glow that runs down the center, the classic full velvet. A diagonal or pointed “cat eye” magnet creates a line or a swirl. Some magnets are double-sided or domed for different effects.
Your move is simple. Apply your magnetic color, and while it is still wet or before you cure it, hold the magnet close to the nail, maybe a few millimeters above, and hold it there for five to ten seconds. Do not touch the polish with it. You will literally watch the shimmer wake up and gather. Closer magnet equals stronger, more concentrated effect. Farther away equals softer.
That is it. That is the “skill.” You are not painting tiny details. You are letting a magnet do the pretty part. My internship self would have wept with relief.

The 18 velvet nail designs to save and try
1. Classic burgundy full velvet
The one that started it for me. A deep wine base with the bar magnet pulled straight down the center. Rich, cozy, universally flattering. If you try one design, make it this.
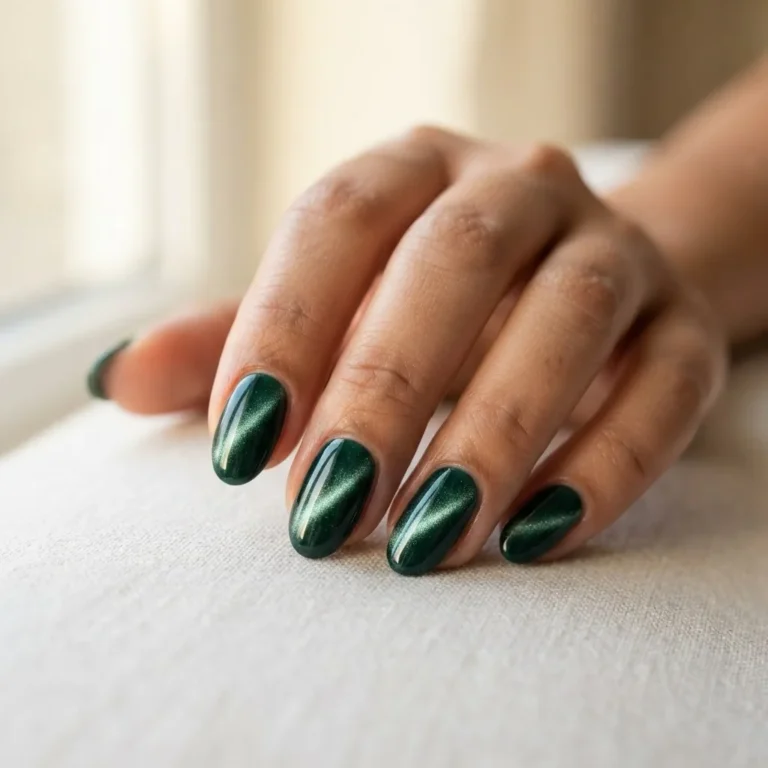
2. Emerald green velvet
Saturated forest or emerald green reads incredibly luxe in velvet form. Deeper shades show the shimmer more dramatically because it contrasts harder against the dark base, which is exactly why jewel tones dominate the velvet trend.
3. Sapphire and midnight blue
A navy-to-royal blue that looks like a night sky when it moves. Gorgeous for evenings and holidays.
4. Plum and mauve velvet
Softer than burgundy, still moody. Perfect if you want something that goes with everything but is not a basic neutral.
5. Chocolate brown velvet
The quiet luxury pick. Warm, expensive-looking, understated. Reviewers and stylists keep calling brown the sleeper hit of the velvet trend, and I agree.
6. Champagne and soft gold
A pale, glowy neutral with velvet shimmer. Works for brides, work, anything. Beginner-friendly because if the pull is a little uneven, it barely shows on a light shade.
7. Dusty rose velvet
Muted pink with a soft center glow. Sweet without being loud.
8. Velvet French tip
Nude or sheer base with a velvet-colored tip. The magnet lives only on the tip. A modern twist on the French that hides beginner wobble because there is no crisp painted line to mess up, the shimmer softens the edge for you.
9. Diagonal cat eye velvet
Use the diagonal magnet to place the bright line off-center. Slightly more advanced, but only because you are aiming the magnet, not because you are painting anything.
10. Velvet swirl
Move the magnet in a small curve as the shimmer gathers, and you get a swirl of light. Playful and a little hypnotic.
11. Galaxy velvet
Deep blue or purple base, magnet pulled to create a scattered, starry depth. Add one tiny rhinestone if you are feeling extra.
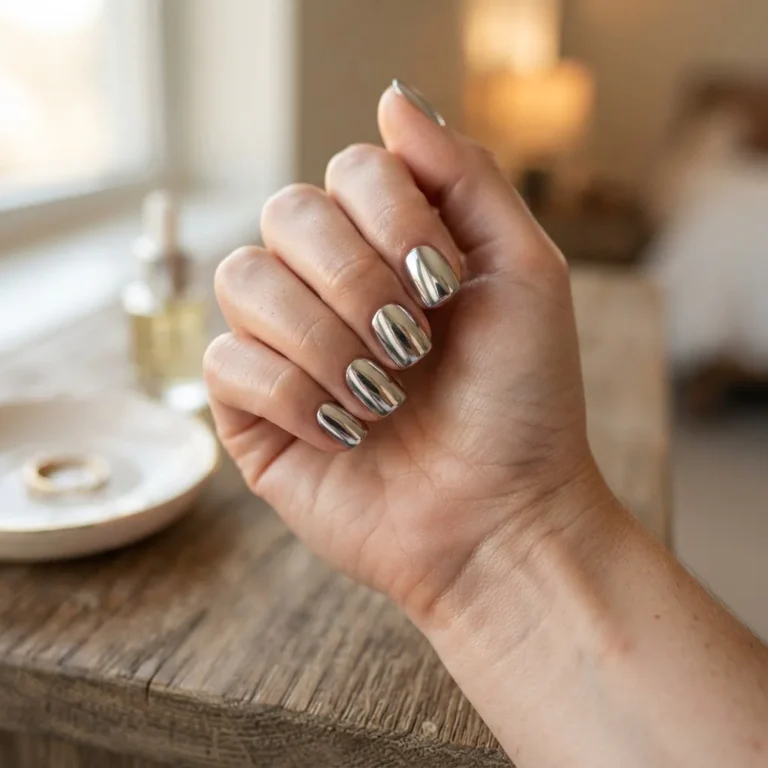
12. Silver and gunmetal velvet
A cool metallic that reads like liquid pewter. Edgy, very fun for a night out.
13. Accent-nail velvet
Paint most nails a solid matte or glossy color, and do velvet on just the ring fingers. Lowest-commitment way to try the trend and use less product.
14. Velvet ombre across the hand
Same color family, but let the magnet pull the glow to a different spot on each nail. Subtle, artsy, no extra skill needed.
15. Periwinkle velvet
That soft blue-purple that keeps trending. Fresh, a little unexpected, flattering on a lot of skin tones.
16. Matcha and sage velvet
Muted green for the girl who wants something different. Soft and earthy.
17. Red velvet (literally)
A true rich red with the magnet down the center. Timeless, holiday-ready, and yes I am delighted by the name too.
18. Chrome-topped velvet
Do your velvet layer, then add a sheer chrome or glazed top for extra dimension. This one is for when you have a few sets under your belt and want to level up.

Making velvet nails work on short nails and every shape
I need to say this loudly because the roundups ignore it. Velvet nails look fantastic on short nails. Maybe even better. The shimmer effect does not need length to show up, and on a short square or round nail the whole thing reads clean and expensive rather than fussy.
If your nails are short, lean into deeper colors, because that contrast does the heavy lifting and makes the effect pop on a small surface. On short square nails, a straight center pull looks crisp and modern. On round or oval, the soft glow follows the natural curve beautifully. Almond and coffin shapes give you more room to play with swirls and diagonal cat eye lines, but you are not missing out if you keep things short. When you prep, gently push back your cuticles rather than cutting them, since the American Academy of Dermatology recommends against cutting cuticles because they seal out bacteria and infection, and a clean nail edge is honestly what makes any color look salon-level.
Whatever your shape, file in one direction, buff lightly so the base grips, and wipe the nail with a bit of alcohol before you start so nothing lifts early.

The prep and application, step by step
Here is my actual kitchen-table routine.
Prep first. Push back cuticles, lightly buff the shine off the nail surface, and wipe with alcohol. Skipping this is the number one reason polish lifts early.
Base coat. Apply a thin base coat. If you are using gel, cure it under your lamp per the bottle’s time. If you are using air-dry, let it set.
The magnetic color. Apply one thin, even coat of your magnetic gel or polish. Thin is key. A thick gloopy coat pulls unevenly and can bubble.
The magnet moment. While that coat is still wet, or before you cure gel, hover the magnet close for five to ten seconds and watch the shimmer gather. Do not let the magnet touch the polish. Then cure it if it is gel, or let it dry if it is air-dry. Many people do a second color coat and re-magnetize for a stronger effect.
Top coat. Seal with a top coat. For gel, cure it fully. This locks in the shimmer and adds that glassy shine.
That is a full velvet set. Ten fingers, maybe 30 to 40 minutes once you get the rhythm. My first attempt took longer and looked slightly patchy on two nails, and it still got compliments. Progress over perfection, always.
Where beginners go wrong, and how to fix every single one
This is the section the pretty magazine posts never give you, so here is my honest troubleshooting from actually messing these up.
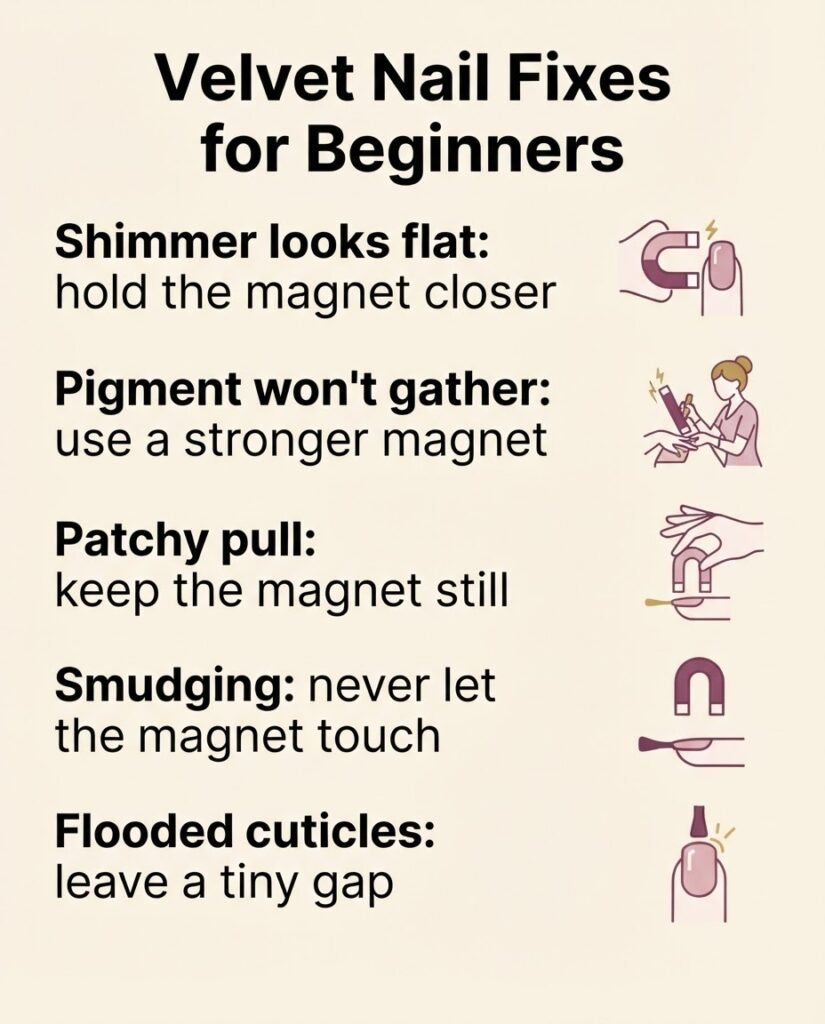
The shimmer barely shows or looks flat. Your magnet was too far away, or you did not hold it long enough. Get it closer, a few millimeters, and hold it a full ten seconds. Also make sure your color coat is not too thin to show pigment, or too thick and drowning it.
The pigment won’t gather at all. Weak or old magnet, or a magnetic polish with low pigment quality. This is where cheap-but-good matters. A stronger magnet fixes most of it.
Patchy, uneven pull across the nail. Usually the coat was applied unevenly, or you moved the magnet around instead of holding it steady. Keep the magnet still. Let the particles do the work.
Smudging the wet layer. The magnet touched the polish, or you top-coated before it set. Keep the magnet hovering, never resting.
Flooded cuticles. Too much polish, brushed too close to the skin. Leave a tiny gap around the cuticle and sidewalls. Clean up mistakes with a small brush dipped in remover before curing.
Bubbling. Coats too thick, or shaking the bottle hard right before use, which whips in air. Roll the bottle between your palms instead.
Lifting after a day or two. Prep problem, almost always. Buff and wipe the nail next time, and cap the free edge by swiping your top coat along the very tip.
Every one of these happened to me at some point. None of them are talent problems. They are technique tweaks, and you will have them dialed in by your second or third set.
Let’s talk safety, honestly
I promised you honesty, so here it is, no fear-mongering.
If you are using gel and a lamp, know what you are working with. The FDA considers nail curing lamps low-risk as they are typically used, and a helpful industry explainer from RadTech lays out how much UV exposure is actually involved during a normal manicure. That said, the American Academy of Dermatology points out that repeated gel manicures can leave nails brittle, peeling, and cracked, and that the UV from the lamps is a skin-aging and skin-cancer consideration for the backs of your hands. A simple move I love is applying a broad-spectrum sunscreen or wearing fingerless UV gloves before you cure. Small habit, real peace of mind.
The other thing worth knowing is allergy. Uncured gel ingredients, especially HEMA and related acrylates, are known skin sensitizers, and a peer-reviewed dermatology review found that allergic contact dermatitis is the most common adverse reaction linked to gel manicures. That is why you fully cure every single layer and avoid getting uncured gel on your skin. If you are new to gel or have sensitive skin, patch testing a product before a full set is genuinely smart, and any persistent itching, redness, or swelling around the nails is a reason to stop and check in with a dermatologist. This is not me trying to scare you off. Millions of people wear gel happily. It is just the stuff a good big sister tells you so you can enjoy the trend for years.
Budget picks vs when to spend
Good news for your wallet. The magnet is the star, and a decent magnet is cheap. Many magnetic polishes come with a small magnet in the cap, which is perfect for starting out. If yours does not gather well, a stronger standalone magnet is usually a few dollars and worth it.
For the polish itself, air-dry magnetic polishes are the budget-friendly entry point because you skip the lamp entirely. If you want longer wear and you already own a lamp, magnetic gel is worth it. Where I would not overspend as a beginner: fancy multi-shape magnet sets. Master the basic bar first. Where a little more money helps: a quality no-wipe top coat, because a cloudy or streaky top coat can ruin an otherwise perfect velvet nail.
How to take them off without wrecking your nails
Please do not peel them. I know the temptation. Peeling gel takes layers of your natural nail with it, and that is where the “gel ruined my nails” horror stories come from. The nails were fine. The removal was the problem.
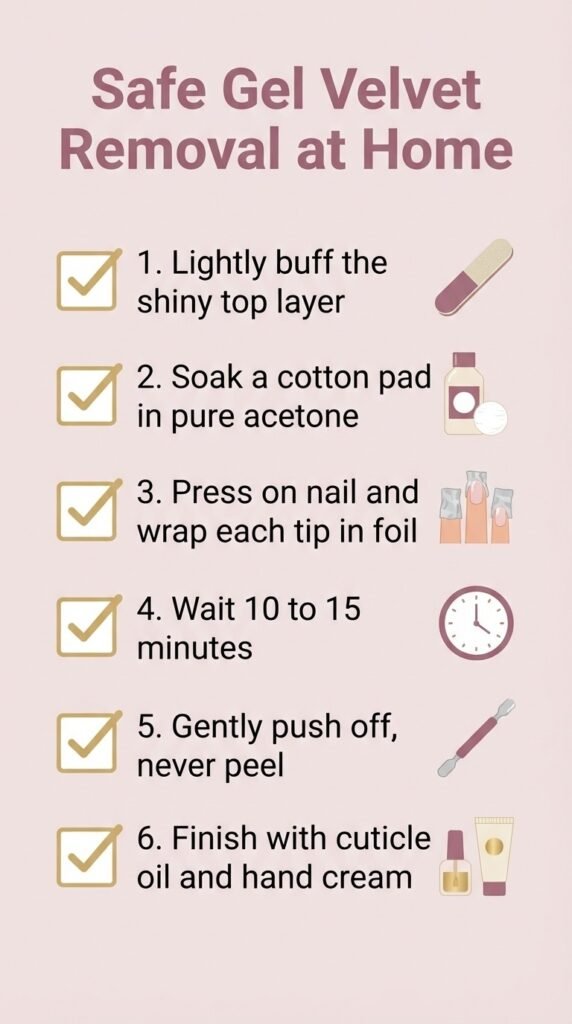
For gel velvet, soak-off with acetone is the way. The AAD shares a dermatologist’s method for safely removing gel at home, and the short version is: lightly buff the shiny top layer, soak a cotton pad in pure acetone, press it on the nail, wrap each fingertip in foil, and wait around 10 to 15 minutes so the gel softens and lifts. Then gently push it off with a wooden stick. If it resists, re-soak. Never force it. Follow up with cuticle oil and a hand cream because acetone is drying.
Air-dry magnetic polish comes off like normal polish with regular remover, which is another reason it is such a friendly starting point.
You’ve got this
Here is my honest promise. Velvet nails look like they took skill and a salon appointment, and they took neither. They took a magnet and a little patience. If your first set has one wonky nail, welcome to the club, redo that one and move on. The whole reason I do this work is because I got tired of people believing pretty nails are only for the naturally artistic or the wealthy. They are not. They are for you, at your table, on a Tuesday.
Save your three favorites from the list, start with a deep color and a bar magnet, and send me a wonky-first-try photo with zero shame. If I can pull this off after a 10-hour workday, you absolutely can too.