Your Deep Conditioning Treatment Is Probably Missing This
Let me tell you something I figured out the hard way. For a solid stretch of my early twenties, I was deep conditioning my hair every single week, using a genuinely good product, and my hair was still dry. Still snapping at the ends. Still looking kind of dull no matter what I did. I kept thinking I just needed a better conditioner, so I kept buying new ones.
Then I started working as a salon assistant in Austin and spent a couple of years watching professional stylists work. And I slowly realized I wasn’t doing anything catastrophically wrong. I was just missing a handful of small things that completely change how well a deep conditioning treatment actually performs. The product was almost never the problem.
This is for everyone who has sat there with a hair mask on for 20 minutes, rinsed it out, and thought “okay but my hair still feels dry though.” Let’s fix that.
Why Dry Hair Needs More Than a Regular Conditioner
Regular conditioner and a deep conditioning treatment are not the same thing, and understanding why matters before we talk about technique. Regular rinse-out conditioner works mainly on the outside layer of your hair strand. It smooths the cuticle, adds a little slip, and makes detangling easier. It is doing surface work, and it does that job well.
A deep conditioner is formulated to go further. It typically contains a higher concentration of emollients, humectants, and proteins, ingredients designed to penetrate the cuticle layer and get into the cortex, the inner structure of the strand. Research published in the journal Cosmetics and available through NIH’s PubMed Central on hair conditioning physicochemistry confirms that conditioning agents need to physically penetrate the cuticle to do meaningful repair work, and that the outer cuticle layer acts as a real barrier, not just a cosmetic surface. This is not marketing language. The science is straightforward: moisture-damaged or structurally weakened hair needs ingredients inside the strand, not just coated on top.
If your hair is dry, brittle, breaking easily, or feeling rough even after washing, your regular conditioner is not built for that job. This is where a real deep conditioning treatment earns its place in your routine.
First: What Is Actually Causing Your Dryness?
Before you optimize your deep conditioning routine, it helps to know what you are working with. Not all dry hair is dry for the same reason.
Heat styling damage is probably the most common culprit. When you use heat above certain temperatures without adequate protection, repeatedly, the cuticle starts to lift and crack. The AAD’s guidance on hair care habits that damage hair puts this plainly: too-frequent heat, rough towel drying, and aggressive brushing when wet are among the most common ways people compromise the hair shaft without realizing it. Color treating and chemical processing also physically disrupt the cuticle layer. Environmental factors like sun, wind, hard water, and low humidity all pull moisture out over time.
Understanding your source of dryness helps you pick the right kind of deep conditioner, which we will get to in a moment.
The Protein vs. Moisture Question (This Is the Big One)
If there is one thing I wish someone had explained to me before I started buying every deep conditioner I could find, it is this: there are two fundamentally different types of deep conditioning treatments, and using the wrong one is one of the main reasons people feel like deep conditioning is not working for them.
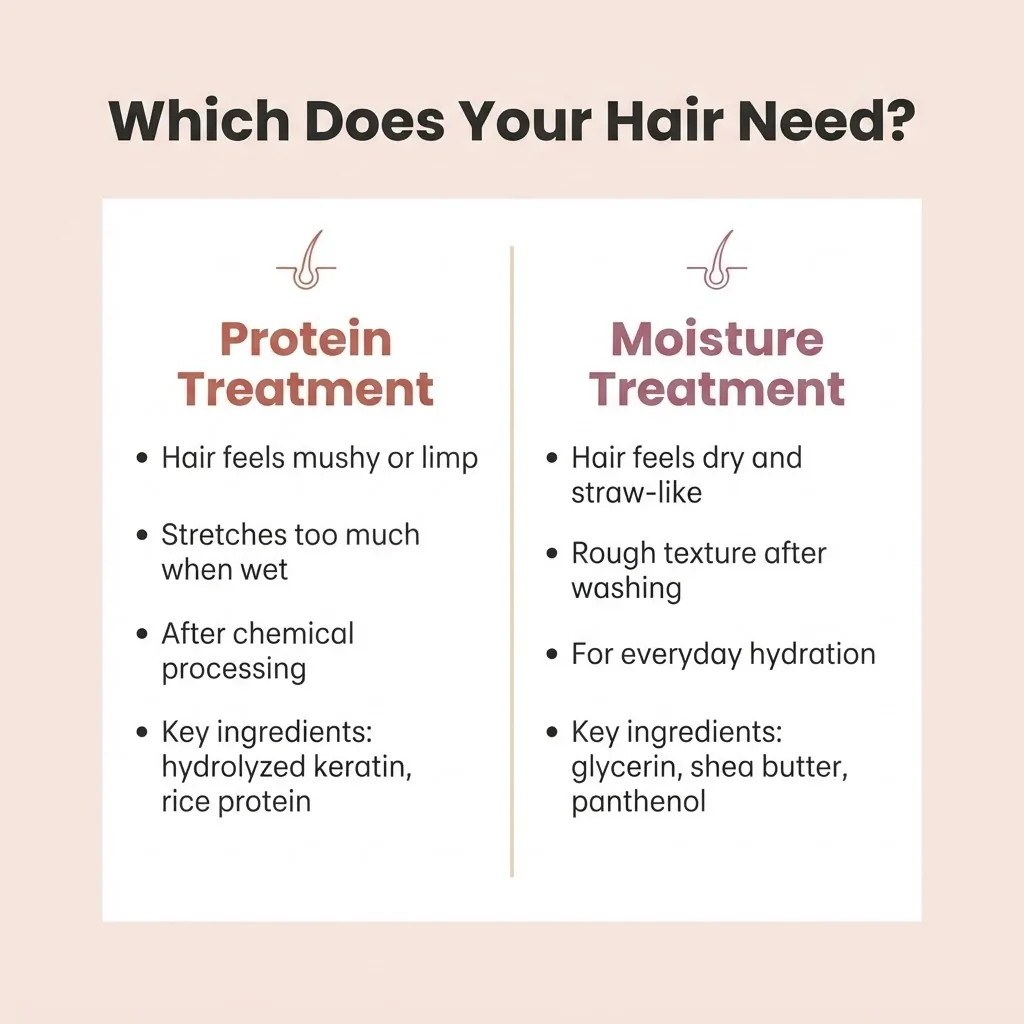
Moisturizing deep conditioners focus on hydration. They are loaded with humectants like glycerin and panthenol, which draw water into the hair, and emollients like shea butter and oils, which seal that moisture in. If your hair feels dry, straw-like, or rough but does not snap easily and has decent elasticity when you stretch a wet strand, you most likely need moisture.
Protein treatments focus on rebuilding structure. They contain hydrolyzed keratin, rice protein, silk amino acids, or similar ingredients that temporarily fill in damaged gaps in the hair’s protein structure. If your hair breaks easily, feels limp and mushy when wet, stretches way too much without bouncing back, or has been chemically processed recently, you likely need some protein.
Here is the thing most tutorials skip: you can have too much of either. Hair that gets too much protein becomes stiff, brittle, and snappy. Hair that gets too much moisture becomes limp, mushy, and stretchy. The real goal is balance between the two. Most people with general dryness will benefit most from a moisturizing deep conditioner used regularly, with an occasional protein treatment once a month or after chemical services. Pay attention to how your hair feels after each treatment, that feedback is your guide.
Hack 1: Clarify Before You Deep Condition
This one sounds boring but it makes a significant difference. If you use dry shampoo, silicones, heavy styling products, or even just regular conditioner regularly, you are building up a layer of coating on your hair shaft. When you apply a deep conditioning treatment on top of that buildup, the product cannot penetrate. It just sits on top of the existing layer.
A clarifying shampoo once or twice a month before your deep conditioning session clears that slate. You do not need anything fancy. Neutrogena Anti-Residue Clarifying Shampoo is around $8 and does exactly what it needs to. Just don’t clarify before every single wash, it is stronger than your regular shampoo and can be drying if overused.
Hack 2: Shampoo Before, Not After
This seems obvious but I still get asked about it. Your deep conditioning treatment goes on after shampooing, not before. Shampoo removes the oils, buildup, and grime that would prevent the conditioner from absorbing properly. Putting a deep conditioner on grimy or product-coated hair is like trying to paint a wall you haven’t cleaned. The product is fighting against everything already on your strand.
The one nuance here: some people with very dry or damaged hair find it helpful to apply their regular rinse-out conditioner first for a minute before they apply their deep conditioner. This is sometimes called “pre-conditioning” and it adds a little slip and protection for hair that is particularly fragile when wet. It is not necessary for everyone, but if your hair is severely damaged or highly porous, it is worth trying.
Hack 3: Section Your Hair Before Applying
I know it feels like extra work but this is one of the highest-impact changes you can make. If you are just squeezing a glob of product into your wet hair and scrunching it in, large sections of your hair are probably not getting adequate coverage, especially in the back. Dividing your hair into four sections (two in front, two in back, secured with clips) and applying the deep conditioner section by section means every strand gets coated from roots to ends.
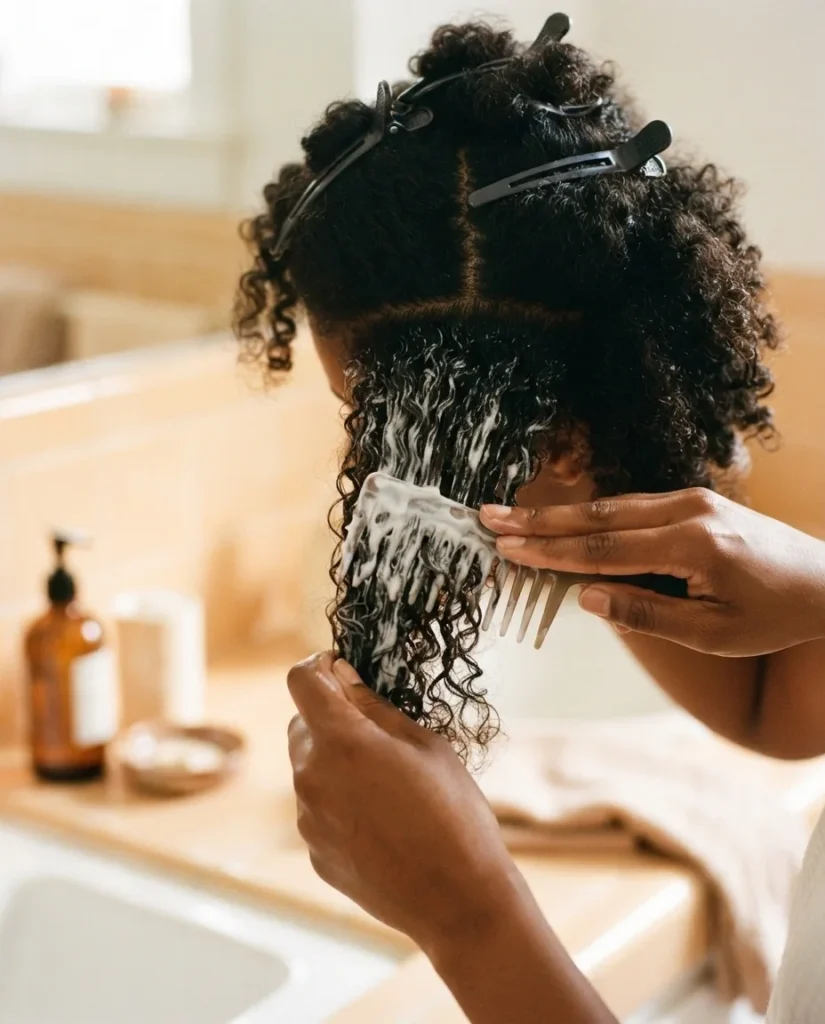
This is especially important for thick, curly, or coily hair.
Hack 4: Apply to Damp Hair, Not Soaking Wet
This is a small but real distinction. Hair that is completely waterlogged has water molecules occupying the spaces where your conditioning product wants to go. Towel-blotting or gently squeezing out the excess water before you apply your deep conditioner means the product can actually get in rather than just sitting in a watery film on the surface. Damp, not dripping.
Hack 5: Work Product From Mid-Length to Ends First
Your ends are almost always the oldest, most damaged, most moisture-depleted part of your hair. They need the product the most and they need it to stay on the longest. Apply your deep conditioner to the ends first, then work your way up to the mid-lengths. You can lightly run product over your roots if you have a very dry scalp, but most deep conditioning formulas are heavy enough that putting them heavily on your roots can weigh fine or medium hair down and clog follicles over time. If you are not sure, focus on mid-length to ends.
Hack 6: Use Gentle Heat (and Here’s the Science Why It Helps)
Heat opens your hair’s cuticle layer, which is exactly what you want when you are trying to drive conditioning ingredients deeper into the strand. You don’t need a professional steamer to get this benefit. Wrapping your hair in a plastic cap and then covering it with a warm, damp towel straight from the microwave works well. A drugstore heat cap (around $15 to $25) is a lovely upgrade if you do this regularly.
The science backs this up.

The same peer-reviewed research on hair conditioning physicochemistry from PMC specifically found that additional heat application causes cuticle scales to lift, measurably increasing penetration of conditioning agents. This is why a 20-minute treatment under a heat cap consistently outperforms a 30-minute treatment at room temperature for most hair types.
One note for low-porosity hair specifically: heat is even more important for you than for anyone else. Low-porosity hair has tightly packed cuticles that resist moisture entry by design. Without heat, a lot of your product will just sit on top of your hair and rinse away. We’ll come back to low-porosity adjustments in a moment.
Hack 7: Respect the Dwell Time (More Time Is Not Always Better)
Most deep conditioners are formulated to do their work in 20 to 30 minutes. That window was set intentionally. If you are rinsing after 5 minutes, you are cutting the absorption short. But if you are leaving it on for 2 hours or sleeping in it, you are not necessarily getting more benefit, and for some hair types you are actively risking a problem called hygral fatigue.
Hygral fatigue happens when the hair shaft swells with moisture and then contracts again repeatedly, stressing the protein bonds inside the strand over time. Healthline’s medically reviewed breakdown of hygral fatigue describes it as presenting with mushy, limp hair with low elasticity, breakage, and a texture that just doesn’t feel right. It is most common in fine hair or hair that has been deep conditioned too frequently or for too long. If your hair started feeling worse after you ramped up your deep conditioning routine, this is worth investigating.
Stick to the time on the label. For most products that is 20 to 30 minutes, under heat. Overnight conditioning with certain dedicated overnight masks is a different category, and those formulas are specifically designed to be worn longer. If a product does not say it is an overnight formula, don’t wear it overnight.
Hack 8: Adjust Your Approach for Your Hair’s Porosity
Porosity is how easily your hair absorbs and holds onto moisture, and it changes how you should approach your entire deep conditioning routine. Olaplex’s guide to low vs. high porosity hair breaks this down clearly: low-porosity hair has tightly closed cuticles that resist moisture entry, while high-porosity hair has lifted or damaged cuticles that absorb quickly but lose moisture just as fast.
Low-porosity hair needs lightweight products, heat during conditioning, and a longer dwell time to compensate for the cuticle resistance. Avoid heavy butters and oils as your main deep conditioning ingredient because they tend to coat the surface rather than absorb. Lighter cream-based conditioners with humectants work better here.
High-porosity hair (often color-treated, heat-damaged, or naturally high-porosity) absorbs product easily but needs sealants afterward to keep moisture in. These hair types often benefit from slightly richer formulas and from finishing with a leave-in and a light sealing oil after rinsing.
Normal porosity hair has the most flexibility and typically responds well to most deep conditioners used correctly.
If you don’t know your porosity, the float test is a quick rough guide: drop a clean, dry shed strand in a glass of water and check after a few minutes. If it sinks quickly, your hair is likely high porosity. If it floats at the top, it is likely low porosity.
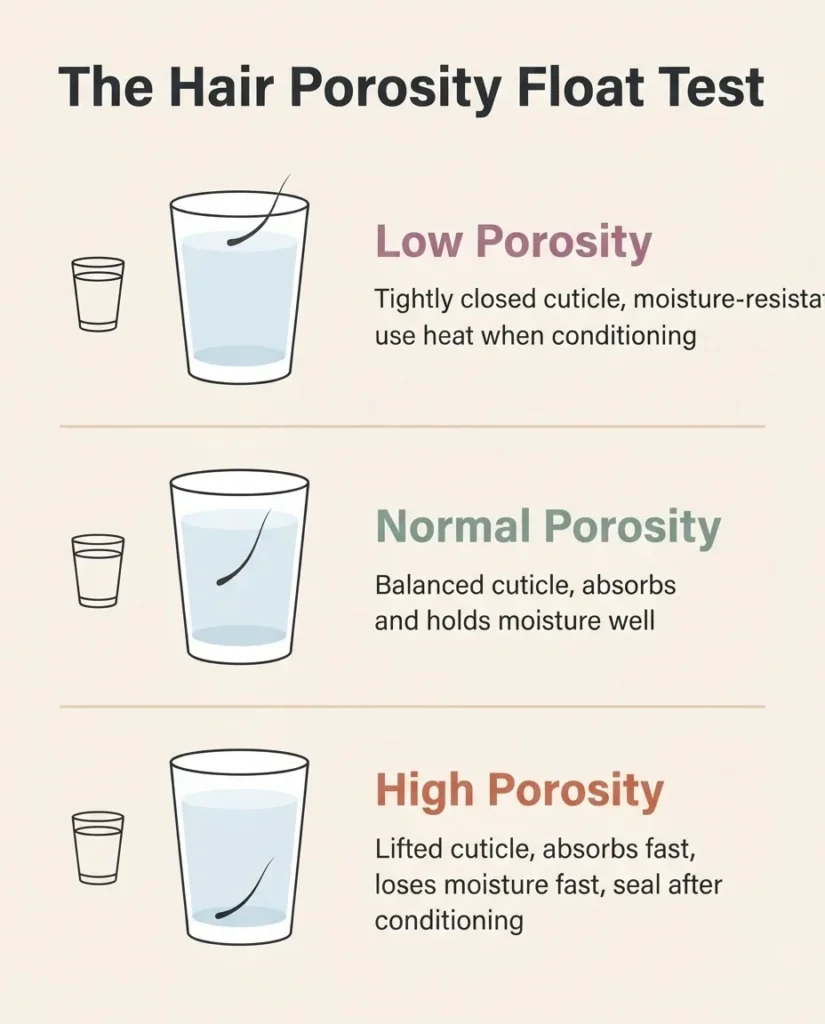
It is not a perfect diagnostic but it gives you a starting point.
Hack 9: Finish With a Cool Water Rinse
This one is quick but genuinely useful. Rinsing your deep conditioner out with cool or cold water helps close the cuticle layer back down after it has been open from the heat and product processing. A closed cuticle reflects light (read: shine) and holds moisture in better than an open one. It is a 10-second swap at the end of your shower and it makes a noticeable difference in how smooth and shiny your hair looks after drying.
Hack 10: Know Your Frequency (More Is Not Better for Everyone)
The default advice of “once a week” gets repeated everywhere, and for many hair types it is a reasonable starting point. But frequency is not one-size-fits-all.
The AAD’s healthy hair tips note that dry, textured, and curly hair often benefits from less frequent shampooing (every two to three weeks) because washing strips natural oils. If you are shampooing less often, you are also deep conditioning less often by default. Fine or straight hair that washes more frequently may deep condition weekly without issue but should watch for over-conditioning signs. Very coily or 4C hair that retains moisture more slowly and has more mechanical friction from twisting and manipulation tends to benefit from weekly deep conditioning. Color-treated or bleached hair may need twice-weekly sessions during active repair periods, but should balance those with protein treatments to avoid hygral fatigue.
The signs you need more: consistent dryness, brittleness, breakage, rough texture after washing. The signs you need less: limp, mushy, low-elasticity hair, or hair that stretches significantly when wet and doesn’t spring back. Listen to your hair more than a schedule.
Hack 11: DIY Options That Actually Work (and One That Doesn’t)
I love a good DIY and I love a good drugstore dupe, but I am also honest when something is overhyped. Here is a quick rundown.
Coconut oil is legitimately backed by research. Its low molecular weight allows it to partially penetrate the hair shaft, unlike most oils which only coat the surface. Apply it to dry or damp hair before shampooing (called a “pre-poo”), cover with a cap for 30 minutes, then shampoo and condition as normal. It works best on medium to coarse hair types. If you have fine hair, coconut oil can be too heavy and cause buildup.
Honey is a humectant, meaning it draws moisture from the air into your hair. A small amount mixed into your regular conditioner or mask adds real hydrating benefit. Don’t use it straight, it is too thick and sticky on its own and hard to rinse.
Rice water contains inositol, a carbohydrate that can penetrate damaged hair and offer some structural support. It is more of a mild protein-adjacent treatment than a moisturizing one. If your hair is moisture-starved rather than protein-starved, rice water alone is not your solution. For fine or protein-sensitive hair, use it sparingly.
The coconut oil-as-everything treatment: I hear this constantly and I want to gently push back. Coconut oil is a great pre-poo for some hair types, but for fine, low-porosity, or protein-sensitive hair it can create buildup and actually block moisture absorption. It is not a universal fix.
Hack 12: Drugstore Deep Conditioners That Genuinely Deliver
You do not need to spend $40 on a hair mask to get real results. Here are the categories that consistently come up in stylist recommendations and community consensus for dry hair:
For general dryness and damage, SheaMoisture Manuka Honey and Mafura Oil Intensive Hydration Hair Masque (around $14 to $16) is a consistent performer with a rich formula suited to medium to thick, dry, or textured hair. It’s One Miracle Moisture Hair Mask (around $8) is one of the best-value options for a quick moisture boost on any hair type.
For color-treated hair, L’Oreal Paris Elvive Total Repair 5 Damage-Erasing Balm (around $7 to $9) consistently gets positive attention for strengthening damaged strands without the heavy residue some treatment masks leave behind.
For fine or low-porosity hair, look for lighter formulas without heavy butters or oils high in the ingredient list. Pantene Pro-V Gold Series Intense Hydrating Treatment works well here because it is lightweight enough not to weigh fine hair down.
For a splurge with real results, Briogeo Don’t Despair, Repair Deep Conditioning Mask ($38) is widely recommended by stylists and has a clean, well-formulated ingredient list. If you want the experience without the price, Aussie 3 Minute Miracle Moist Deep Conditioner (around $4 to $6) punches well above its price point for a quick weekly treatment.
Hack 13: The Baggy Method for Extremely Dry Ends
If your ends are particularly parched, the baggy method is worth knowing. After moisturizing your ends with a leave-in conditioner or a small amount of deep conditioner, wrap just your ends in a small plastic bag or plastic wrap and pin it in place. Wear it for a few hours or during a low-heat activity like watching TV. The heat from your own body and the trapped moisture creates a mini-greenhouse effect that drives hydration into the strand. It sounds a little odd but it is one of those techniques that genuinely gets results for people with very dry or damaged ends. Do not sleep in it, and do not apply it to your scalp.
Hack 14: Deep Conditioning Color-Treated Hair
If you color your hair, your deep conditioning routine needs a little extra thought. Chemical processing, whether permanent dye, bleach, highlights, or relaxers, lifts and damages the cuticle layer in the process of depositing or removing color. This makes your hair temporarily more porous and more vulnerable to further damage. The week immediately following any chemical service is when a good deep conditioning treatment makes the most impact.
One practical note: if you have just dyed your hair at home or in a salon, wait 48 to 72 hours before your first post-color deep conditioning session. This allows the color molecules to fully settle into the cortex and helps the shade last longer. After that window, regular moisturizing deep conditioning (not protein-heavy treatments in the first few weeks) will help stabilize the hair’s texture and maintain shine. If you are bleaching or using strong developer concentrations, please consult a professional stylist, especially if you are new to chemical services. At-home bleaching errors are harder to reverse than most other hair mistakes and the line between manageable and significant damage is thin.
Hack 15: Deep Conditioning Natural and Coily Hair (3B to 4C Types)
Tightly coiled and natural hair textures have specific mechanics worth understanding. Because of the tight curl pattern, the natural oils produced by the scalp have a harder time traveling down the hair shaft compared to straight or loosely waved hair. This makes coily hair textures structurally more prone to dryness at the mid-lengths and ends, not because the scalp isn’t producing oil, but because the geometry of the curl slows that oil’s journey.
For 3B to 4C natural hair, a few adjustments make a real difference: always apply deep conditioner in sections, use generous amounts and finger-detangle as you apply to ensure full coverage, use heat, and give the product the full dwell time.
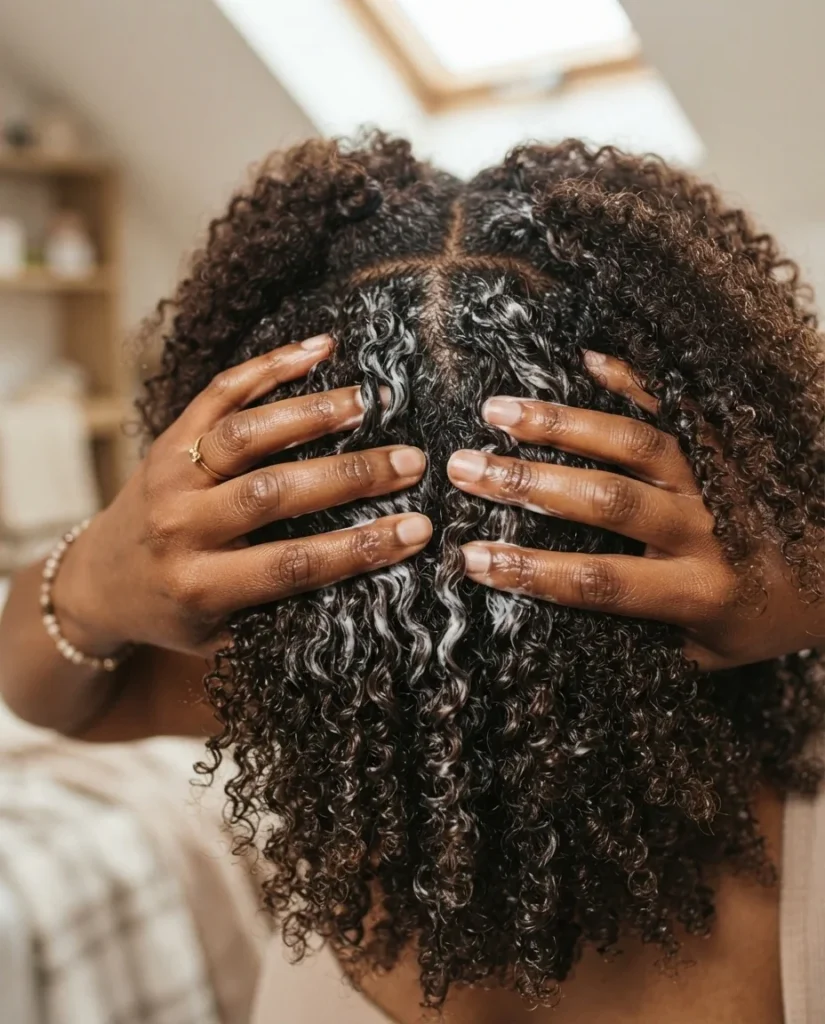
The LOC method (Leave-in, Oil, Cream) applied after rinsing helps lock in the moisture you just worked to put in. Frequency is also higher for most coily textures, weekly is generally the right baseline.
Hack 16: The One Thing Fine Hair Needs to Watch
Fine hair can absolutely benefit from a deep conditioning treatment, it just needs a lighter touch. Because fine strands have less structural volume, heavy conditioning products can flatten the hair, make it feel greasy faster, and over time can lead to the mushy over-conditioned texture we talked about earlier. For fine hair, use about half the amount of product you think you need, keep the product off the roots entirely, and limit deep conditioning to once every one to two weeks rather than weekly. If you notice your hair feels limp and flat after deep conditioning rather than softer and healthier, you may either be over-conditioning or using a formula that is too rich for your texture. Switch to a lighter mask and see if the result improves.
Hack 17: Do Not Skip the Leave-In After
Your deep conditioning treatment opens and softens the cuticle to deliver hydration. When you rinse it out, some of that moisture rinses away with it. A lightweight leave-in conditioner applied to damp hair after your rinse helps hold what you just put in. Think of the deep conditioner as the treatment and the leave-in as the sealer. This one-two step makes a measurable difference in how long the softness and flexibility from your deep conditioning session actually lasts between wash days.
Hack 18: Build the Routine, Then Give It Time
Here is the honest part that I always want to make sure is in every haircare post I write: real improvement in dry or damaged hair takes weeks, not days. One deep conditioning treatment will not transform severely damaged hair. What you are building with a consistent deep conditioning routine is cumulative improvement: gradually more hydrated strands, gradually less breakage, gradually more elasticity and shine. If you do this correctly and consistently for four to six weeks, you will notice a genuine difference in texture and feel. If you are not seeing any improvement after six weeks of doing everything right, it may be worth visiting a dermatologist, especially if your hair feels like it is thinning or breaking from the root rather than just at the ends. Some dryness and breakage has underlying causes that go beyond topical treatment.
Deep conditioning done well is genuinely one of the most effective things you can do for dry hair at home. It is also one of those routines where small adjustments compound. Get the right type of product for your hair’s actual needs, prep the hair correctly, use heat, respect the dwell time, and finish the job with a cool rinse and a leave-in. That is the whole system.
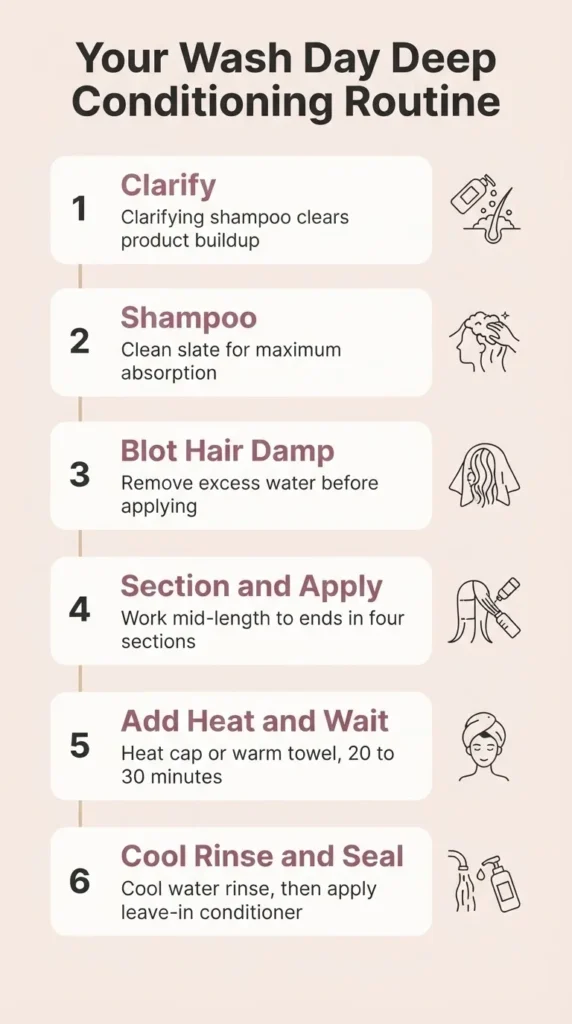
You do not need the most expensive product on the shelf to see it work.
You have got this, and your hair will thank you for it.