Here’s a scenario I hear constantly: you get a wedding invitation, you immediately start saving hair inspo on Pinterest, you build a whole board of gorgeous styles, and then the day before the wedding you look at those pins and think, “Yeah, I could never actually do that.” And then you just wear your hair down.
I’ve been there. I get it. And I’m here to tell you that most of those styles you saved? You can do them. The gap between “I could never” and “I did it” is usually just knowing which exact steps to take, which tools you actually need, and having someone honest tell you how hard each style really is.
That’s what this whole guide is. I’ve broken down 18 wedding guest hairstyles into groups based on how involved they are, with real technique notes, hair-type adjustments, accessory ideas, and troubleshooting for the spots where most beginners run into trouble. Whether you have a beach wedding in two days or a black-tie affair in two weeks, there’s something here for you.
Let’s do this.
Before You Start: The Tools That Actually Matter
You don’t need a professional kit. But you do need a few things, and buying the wrong ones will make everything harder. Here’s the honest list:
Bobby pins are non-negotiable for updos. Buy more than you think you need, and buy the ones that match your hair color. The most important thing most beginners don’t know: the wavy, ridged side of the pin goes down, facing your scalp. That’s the grip side. Inserting them smooth-side-down is one of the biggest reasons updos fall apart.

At hair.com’s guide to bobby pin techniques, stylists consistently recommend the “X method,” where you cross two pins over each other when securing a section. It holds dramatically better than a single pin in one direction.
Clear or black elastics are better for updos than the thick fabric ones, which add too much bulk. A few mini claw clips are handy for holding sections while you work. A large claw clip is genuinely the shortcut tool of the year for a whole category of looks. And a can of medium-to-strong-hold flexible hairspray (not the stiff, crunchy kind) is what keeps everything together without making your hair feel like a helmet.
For heat styling: a 1-inch or 1.25-inch curling wand or barrel iron is the most versatile size for adding waves or curl before putting hair up. If you have fine hair, use the lowest heat setting that actually works for your hair. The American Academy of Dermatology recommends using the lowest heat setting possible and letting your hair partially air dry before heat styling to reduce the risk of heat damage, which you can read more about in their healthy hair tips guide. A lightweight heat protectant spray applied before any hot tool is not optional. It takes five seconds and it matters.
One thing I want you to hear: none of these styles needs to be perfect.

Perfectly imperfect is genuinely the aesthetic right now. Loose, undone, a little romantic. The goal is “I put in effort” not “I spent four hours in a salon chair.” That means your slight wobble in the braid or the few loose pieces around your face are actually part of the look.
The 18 Looks: Organized by Skill Level and Style
I’ve split these into three tiers: low-lift (15 minutes or under, minimal skill needed), mid-level (20 to 40 minutes, a few techniques to practice), and elevated (40-plus minutes or techniques worth trying once before the day).
LOW-LIFT UPDOS: Maximum Impact, Minimum Effort
1. The Claw Clip Chignon
Difficulty: Beginner. Time: under 5 minutes.
This is the look that has taken over Pinterest and TikTok for two straight years and it shows no signs of slowing down. The basic version: gather your hair at the nape of your neck or slightly above, loosely twist it, and clip it with a large claw clip. The magic is in the twist direction and how much you pull the ends through the clip versus let them fan out the top.
For fine hair, scrunch in a little texturizing spray first. For thick hair, section the top half off first, clip the bottom half, then fold the top section over and clip again. Both go directly into the clip.
What makes it look polished versus sloppy is the face-framing pieces. Leave out two pieces at the front, curl them loosely around your finger, and pin lightly with a bobby pin at the temple. That’s it. It goes from “I just grabbed my hair” to “I planned this.”
2. The Low Messy Bun (Alix Earle-Inspired)
Difficulty: Beginner. Time: 5 to 10 minutes.
This is currently one of the most-requested wedding guest looks according to stylists quoted in WhoWhatWear’s 2025 celebrity wedding guest hairstyle roundup. The key, per stylist Megan Robinson, is to NOT brush your hair out first. The texture you already have is an asset. Pull your hair into a low pony at the nape, leave the last loop of the hair tie halfway through so you have a looped bun shape, then spread the loop wider and pin the ends in different directions with bobby pins to create volume.
Pull a few pieces from the sides of the bun to make it feel effortless. Spritz the bun (not the roots) with hairspray and lightly scrunch it with your palm to set the texture.
Troubleshooting: If your bun looks flat rather than full, try teasing the sections before you place them. If it keeps falling apart, you need more bobby pins than you think. Cross them in that X shape I mentioned earlier.
3. The Slicked-Back Low Bun (Hailey Bieber Style)
Difficulty: Beginner to intermediate. Time: 10 to 15 minutes.
The polished version of the messy bun. This one requires a little gel or edge cream for the sleek look, a fine-tooth comb, and patience. Part your hair in the middle (or slightly off-center if that’s more flattering for your face shape). Use a small amount of gel or smoothing cream, about the size of a pea for fine hair and a dime for thicker hair, and smooth from roots toward the back. Pull into a low elastic at the nape, tuck the tail into itself, and pin flat to the head.
The difference between this looking chic versus stiff is the amount of product. Less than you think. If it’s crunchy, you used too much.
For oval or long faces, this look is universally flattering because it clears the face and neck. For round faces, try placing the bun slightly off-center rather than dead center at the back.
4. The High Bun with Face-Framing Tendrils
Difficulty: Beginner. Time: 10 minutes.
Pull everything into a high pony at the crown, loop into a bun, and pin. The part that elevates it: before you put the pony up, leave two pieces at each temple loose, and curl them with a wand or with your fingers (wrap them tightly, hold for 30 seconds, release). Those tendrils are everything. Celebrity stylist Chuck Amos specifically calls out “light tendrils and curtain bangs” as what transforms a basic updo into something romantic.
Great for heart-shaped faces because it draws attention to the cheekbones and keeps volume at the top.
5. The Elegant Ponytail (Polished Version)
Difficulty: Beginner. Time: 10 minutes.
A high or low ponytail can absolutely be an event-worthy hairstyle. The trick that makes it look intentional: after you put the ponytail in, take a small section from the pony itself, wrap it around the elastic until the elastic is hidden, and pin it underneath with a bobby pin. That one step is what separates a “going to the gym” pony from an “I’m attending a formal event” pony.

Add a silk scarf, a ribbon, or a bow at the base for an extra layer of style that requires zero additional hair skills.
MID-LEVEL UPDOS: A Little More Technique, A Lot More Wow
6. The French Twist
Difficulty: Intermediate. Time: 15 to 20 minutes.
The French twist is one of those styles that looks much harder than it is once you understand the mechanics. Gather all your hair to one side at the back of your head, hold it vertically, then roll it upward while tucking the ends inside as you go. Pin the roll flat against your head with bobby pins inserted horizontally through the fold of the twist. It holds best on day-old hair (not freshly washed, which can be too slippery).
Fine-hair tip: backcomb the interior of the section lightly before rolling. It gives the pins something to grab.
Thick-hair tip: split your hair into two horizontal sections. Do the twist with the bottom section first, pin it, then fold the top section over it and pin again.
The French twist looks genuinely stunning with delicate pearl pins or simple gold pins tucked along the roll.
7. The Braided Headband Updo
Difficulty: Intermediate. Time: 20 minutes.
This one looks incredibly polished and it intimidates people unnecessarily. Take a small section from one side of your face, just behind the temple. Braid it (a simple three-strand braid is fine, a rope twist looks even nicer). Bring the braid across the crown like a headband and pin it on the opposite side. That’s the whole move. Everything else, your remaining hair can be in a bun, loose waves, whatever works for you.
For textured or natural hair, this braid style is particularly beautiful because the texture gives the braid dimension that straight hair takes more effort to achieve.
8. The Knotted Updo
Difficulty: Intermediate. Time: 15 to 25 minutes.
Divide your hair into two sections, top and bottom. Tie the bottom section into a knot at the nape of the neck by wrapping one piece over the other, like you’re tying the first step of a shoelace, then pin the ends upward. Take the top section, twist it loosely, and tuck it into/over the knot below. Pin everything in place. Add a few face-framing pieces. Step back. It looks like a complicated structural updo and it took 20 minutes.
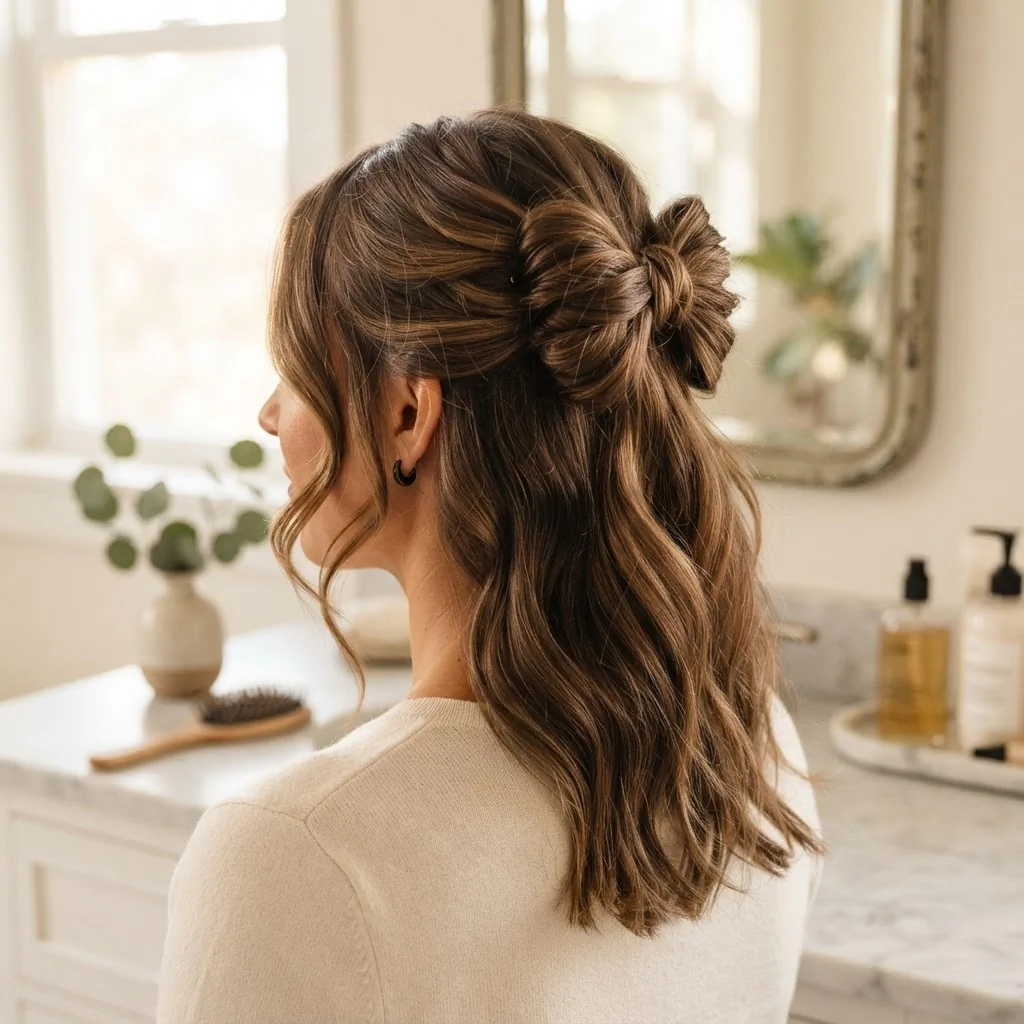
9. The Twisted Half-Up with a Bow
Difficulty: Beginner to intermediate. Time: 15 minutes.
The bow moment is huge right now. Take the top third of your hair, split it in half left and right, do a half-knot, and on the second loop, don’t pull the tail all the way through. Leave the looped section as a bow, spread the loops wide, and pin the tails down flat. Everything below the bow falls loose.
This works on straight, wavy, and lightly curly hair. It looks intentionally playful and it photographs beautifully.
10. The Crisscross Low Bun
Difficulty: Intermediate. Time: 20 minutes.
Pull hair into a low pony. Split the tail into two equal sections. Cross the right section over the left, wrap it around the base of the pony, and pin. Then take the left section, cross it the other way, wrap, and pin. Keep crossing and pinning until you run out of length, then tuck the ends under. The crisscross pattern creates visual interest that looks textured and intentional.
This one genuinely photographs amazingly from behind, which matters at a wedding.
11. The Half-Up Half-Down with Soft Curls
Difficulty: Intermediate. Time: 25 to 35 minutes.
This is consistently one of the most popular styles for wedding guests because it works for almost every face shape and most hair types. Curl your hair first (or use heatless overnight curls the night before, which I will always recommend if you have the time, because they’re gentler on your hair). Take the top half, twist it loosely, and pin at the crown. Leave everything else flowing.
The thing that makes or breaks this look is the size and looseness of the curl. Tight ringlets feel dated. Loose, flowing waves are the current sweet spot. If you’re nervous about heat styling, the AAD’s guide to heat styling without damage is genuinely worth a read before you pick up a hot tool.
For curly or wavy hair, this is your easiest possible style.

Let your natural texture do the work below the half-up section and just focus on making the pinned section smooth and intentional.
12. The Low Chignon
Difficulty: Intermediate. Time: 20 to 30 minutes.
The chignon is one of the most classic wedding-appropriate styles there is. Pull hair into a low pony, tease the tail lightly for volume, twist it around the base, and pin. The secret to a chignon that looks polished (not like a lunch break bun) is how you smooth the top sections before the elastic. A soft-bristle brush and one pass of a flat iron on the top panels makes a big difference.
Add pearl pins or simple rhinestone pins along the base for an elevated detail that takes 30 seconds.
13. The Rope Braid Updo
Difficulty: Intermediate. Time: 25 to 30 minutes.
A rope braid uses two sections twisted in the same direction, then wrapped around each other in the opposite direction. It creates a gorgeous textured twist that looks like a braid but takes less coordination. Once you have your rope braid made, coil it into a low bun and pin the tail underneath. It’s an absolutely stunning updo that consistently surprises people with how simple the base technique is.

ELEVATED UPDOS: Worth Practicing Once Before the Day
14. The Twisted Bun with Volume
Difficulty: Intermediate to advanced. Time: 30 to 45 minutes.
This is the style that looks like it required professional hands. Take the top half of your hair and backcomb the roots gently for volume. Pull it into a high pony. Take the remaining bottom section, twist it, and wrap it around the high pony base. Pin the bottom section’s tail underneath. Then take the high pony, fan it into sections, twist each one lightly, and pin them in different directions around the base to create a full, voluminous bun shape.
The fullness you get depends entirely on how many sections you split the pony into and how far apart you pin them. More sections pinned farther apart equals more volume.
15. The Braided Low Updo
Difficulty: Intermediate to advanced. Time: 30 to 45 minutes.
This is a style where a Dutch braid or French braid at the crown pulls back into a low bun or pinned style at the nape. It’s genuinely beautiful and feels very bridal-adjacent. For a Dutch braid specifically, you work with three sections and cross them under rather than over, which creates the raised, three-dimensional braid look that photographs so well.
This style is worth practicing once or twice the week before the wedding. The good news is that it doesn’t have to be flawless. A slightly imperfect braid that gets pinned into a romantic updo looks more intentional than a rigid, overly tight one.
16. The French Braid Into a Low Bun
Difficulty: Intermediate to advanced. Time: 35 to 45 minutes.
Start a French braid at the crown, add sections as you move down, then when you run out of sections to add, transition into a regular three-strand braid and coil the tail into a bun at the nape. Pin and secure. This style holds exceptionally well for long events because the braid itself is doing most of the structural work.
If you struggle with French braiding your own hair, back of the head, try doing it in a lower position, closer to the nape. Starting the braid lower is significantly easier than starting it high at the crown.
17. The Double Twisted Updo
Difficulty: Advanced beginner. Time: 30 minutes.
Section your hair into four equal quadrants. Twist each quadrant toward the back, secure at the center back with bobby pins, and tuck the ends upward or under. This creates a pinned, textural updo that looks complex but is really just four twists pinned together. The key is making sure each twist starts from the same level on each side so the finished style sits evenly.
This one is highly adaptable. You can make it look sleek by keeping each twist tight and smooth, or romantic and loose by pulling a few pieces out before pinning.
18. The Bejeweled Updo with Accessories
Difficulty: Beginner base, elevated by accessories. Time: 20 to 35 minutes.
This category is more about what you add than the base style itself. Any of the updos above, the chignon, the low bun, the twisted updo, can become truly event-worthy with the right accessory. Pearl pins threaded through a bun, a jeweled comb at the nape, a gold barrette across a half-up style, a silk ribbon tied at the base of a chignon. These aren’t expensive and they change everything.

The styling community has consistently pointed to hair jewelry as one of the biggest ways to make a simple style look intentional for a formal event. If you want to look like you made real effort with minimal actual effort, this is your move.
Hair Type and Texture: Making These Work for You
Not every updo works the same way on every hair type, and I want to address that directly rather than leaving you to figure it out alone.
If you have fine or thin hair, the biggest challenge is creating enough grip and volume for a updo to feel substantial. Day-old hair (hair washed the night before, not the morning of) holds bobby pins better because it has a little natural oil and texture. Texturizing spray or dry shampoo at the roots before styling adds both grip and lift. For the puffs and buns, don’t brush out fully before putting hair up or you’ll lose the texture.
The WhoWhatWear team noted that clip-in extensions are also a legitimate option for fine-haired guests who want the volume they’re seeing in inspiration photos.
If you have thick hair, the challenge is the opposite: controlling bulk so the style sits close to the head and doesn’t become a giant shapeless mass. Work in two horizontal sections for most updos, build the bottom layer first, then fold the top layer over it. This creates a more defined shape. Don’t skip the final spritz of flexible hold spray, it tames the surface without flattening the style.
If you have curly or naturally textured hair, you have a beautiful advantage: your hair has natural volume and texture that straight-haired people have to work to create. For most of these updo styles, finger coiling a few of the face-framing sections before pinning adds a gorgeous detail. The American Academy of Dermatology has solid guidance on caring for natural and textured hair that’s worth bookmarking for your overall hair care routine. For weddings specifically, lighter products like water-based curl creams and flexible hold sprays tend to work better than heavy gels for keeping texture looking defined without stiffness.
A Note on Keeping These Styles Safe for Your Hair
I talk about updos and formal styles a lot, and I want to be straightforward about something. Updos that are pulled very tightly at the roots, repeatedly, over time, can stress the hairline and follicles. The American Academy of Dermatology has an honest breakdown of how tight hairstyles can contribute to traction alopecia, a form of gradual hair loss that affects the hairline. For a single wedding, a pulled style is completely fine. But the key is keeping the tension at a comfortable level and not yanking the style painfully tight. You should not feel pulling at your scalp after styling. If you do, loosen it. A slightly looser bun that is comfortable is always better than a tight one that’s hurting your hairline.
For heat styling in general, keep your tools at medium heat rather than maximum, always use a heat protectant spray first, and if you’re doing heatless curls the night before (which I genuinely love for event prep), you’re giving your hair a break while still getting beautiful texture to work with.
The Getting-Ready Timeline: How to Actually Pull This Off
The morning of a wedding is stressful and this is always overlooked in updo guides. Here’s the realistic timeline depending on which style you chose:
Low-lift styles (claw clip, messy bun, polished pony): Get dressed first, do your updo last. These take 5 to 15 minutes and look best freshly done. Wash hair the night before if possible.
Mid-level styles (chignon, twisted half-up, knotted updo): Build in 30 to 45 minutes. Do hair before makeup so sprays don’t land on a finished face. Have your tools out and organized before you start.
Elevated styles (braided updos, double twisted, voluminous buns): Give yourself 45 to 60 minutes. Do a practice run the week before. Have extra bobby pins on hand (bring 20 minimum). Carry a small roll of bobby pins and a travel-size hairspray in your clutch for touch-ups.

The biggest mistake I see is people trying a new technique for the first time the morning of the event. Practice once, even loosely, at least two days before. Even a 10-minute run-through tells you which parts to expect to struggle with.