9 Easy Heatless Curls for Short Hair That Actually Hold
Let me guess. You have saved about forty heatless curl videos, every single one is on hair that reaches someone’s waist, and you are sitting there with your bob or your lob or your grown-out pixie thinking, “cute, but that will never work on me.”
I promise you it will. Short hair takes heatless curls beautifully. You just have to tweak a few things that nobody bothers to explain, because most tutorials assume you have a foot of hair to wrap around a giant rod.
Back in my salon assistant days in Austin, I spent a lot of quiet hours watching stylists set short hair with nothing but a spray bottle, some clips, and a little patience. It looked like magic. It is not magic. It is damp hair, the right size roller, and knowing why the curl holds. I am going to hand you all of that, plus nine methods you can actually do on yourself tonight, without a single hot tool.
Here is my honest promise. Some of these will click for you on the first try. One or two will take a couple of practice runs. That is normal, and it is not a sign you are doing it wrong. It is just hair being hair.
First, Why Heatless Curls Even Work (This Is the Part That Saves Your Curls)
Quick science, because understanding this one thing is the difference between curls that last all day and curls that fall out before you finish your coffee.
Your hair is held in its shape by tiny bonds, and some of them, called hydrogen bonds, are temporary. Water breaks them. So when your hair is damp and you wrap it around a curler, the hair sets into that new curled shape as it dries, and the bonds reform in the curled position. Once it is fully dry, the curl “remembers” that shape until the next time it gets wet. That is the whole trick. It is the same reason a wet setting lasts and a rushed one does not.
This is why the two most common short-hair curl fails happen. If your hair is too wet, it will not dry all the way inside the wrap and you will unwrap damp, floppy, uncurled hair. If your hair is bone dry when you start, there is barely anything for the curl to grab onto, so it drops fast. The sweet spot is damp, think roughly seventy percent dry, cool to the touch but not dripping.

Your hair’s porosity matters here too, and it explains a lot of the “why won’t mine hold” frustration. As this cosmetic-science primer on hair porosity lays out, low-porosity hair resists water and dries slowly, so it needs more setting time before you unwrap. High-porosity hair drinks up water and loses it fast, so it might take a curl quickly but drop it just as quickly unless you lock it in with product. You do not need to obsess over your porosity type. You just need to know that dry time is personal, and rushing it is the enemy.
What You Actually Need (Spoiler: Probably Stuff You Own)
You do not need a fancy kit. Here is the honest short list, with a dupe for almost everything.
For the wrap itself, you want something soft. A branded curling headband or robe curler works, but a rolled-up soft T-shirt, a fabric belt, a set of foam rollers, flexi rods, or even a few satin scrunchies will all get you there. Short hair genuinely benefits from smaller curlers, so if you are buying anything, buy small to medium. Big rods just slide off short strands.
For grip and hold, a light styling product is your best friend, especially if your hair is fine and slippery. Reviewers and stylists consistently reach for a volumizing mousse or a light styling cream for this, because it gives fine hair something to hold the shape. A flexible-hold hairspray at the end helps too. If your hair is thick or coarse, a curl cream or a little sea salt spray adds grip without stiffness.
For overnight versions, a satin or silk pillowcase or bonnet reduces the friction that causes frizz and helps your set survive the night. More on that near the end.
And that is it. Clips or bobby pins to secure things, a spray bottle of water, and your hands. Let’s get into the nine.
The 9 Heatless Curls for Short Hair
1. Robe or Headband Curls (The Viral One, Adapted for Short Hair)
This is the method that took over Pinterest, and it does work on short hair if you size it down. You lay a soft curling headband or a rolled robe tie across the top of your head, then wrap sections of damp hair around it, adding more hair as you move down, kind of like a rope braid over the band. Secure the ends with a small clip.
The short-hair fix nobody mentions: use a thinner band and start your wrapping closer to your face so your short front pieces actually catch. If your ends keep slipping out, tuck them under and pin them. The official RobeCurls headband tutorial shows the basic wrapping motion clearly, and once you see the wrap once, your hands remember it. For a bob, one band down each side is plenty. For a pixie, honestly, skip to method 4 or 6.

Expect this to take a few tries. My first robe curl attempt looked like a lopsided cinnamon roll. By the third, it was smooth.
2. Foam Roller Set
Old school and undefeated. Foam rollers are soft enough to sleep in and small enough for short hair, which is exactly why they win here. On damp hair with a little mousse, roll two-inch sections up toward your scalp and clip.
The trick with foam rollers, and this is straight from people who set hair this way constantly, is do not roll them so tight that you squish the foam flat. You want gentle tension, not a death grip. Too tight gives you a kinked crease instead of a soft curl. For short hair, smaller rollers near the front and slightly larger toward the crown give you a natural, blended look instead of uniform ringlets.
3. Flexi Rod Curls
Flexi rods are those bendy foam sticks, and they are fantastic for short hair because they come in tiny sizes and you just fold the ends to lock them. No clips needed. Wrap a damp section around the rod, bend both ends in, done.
Thinner rods give you tight, springy curls, great for pixies and short bobs that want a lot of texture. Thicker rods give you loose waves. If you are somewhere in between on length, mix rod sizes for a more effortless result. This one is genuinely beginner-friendly because there is no wrapping technique to master, you just roll and bend.
4. Pin Curls (Best Friend of Really Short Hair)
If your hair is too short for anything to stay wrapped, pin curls are your answer, and they are the vintage secret weapon I fell in love with in the salon. You take a small damp section, wind it around your finger into a flat coil against your head, slide your finger out, and pin the coil flat with a bobby pin or two crossed into an X.
Pixies and very short bobs, this is your method. It costs nothing, it uses only bobby pins, and it gives you that soft finger-wave, old-Hollywood texture. The learning curve is real for the first few coils, then it clicks. Direction matters: curl the front pieces away from your face for the most flattering shape.
5. Braid Waves
The lowest-effort entry on this list. Braid your damp hair, sleep on it, unravel in the morning. That is the whole method. It gives you a soft, beachy S-wave rather than a defined curl.
For short hair, do two or three small braids on each side rather than one big one, because more braids means more waves packed into less length. A tighter braid gives you crimped, defined waves. A looser braid gives you gentle bends. If your hair is very short, French braid or Dutch braid close to the scalp so the braid actually holds instead of falling out the bottom.
6. Bantu Knots
Bantu knots give you gorgeous, springy curls and they work on short hair because the whole style lives close to your head. You section damp hair, twist each section tight, then coil that twist into a little knot against your scalp and pin it. Unravel once fully dry.
This method shines on thick, coarse, or textured hair, and it defines curls beautifully. Smaller sections give you tighter, more defined curls, which is exactly what you want on short hair for a full look. Just make sure the knots are truly dry before you take them down, or you will get frizz instead of definition. Because bantu knots and braids do pull a bit at the scalp, keep the tension comfortable and do not sleep in them night after night. The American Academy of Dermatology’s styling guidance points out that continuously wearing tight, pulling styles can stress the hair over time, so give your scalp regular breaks between sets.
7. Sock or T-Shirt Curls
The ultimate broke-college-me method, and it still works. Roll a damp section of hair around a soft sock or a strip of an old cotton T-shirt, then tie or fold to secure. The soft fabric is comfy to sleep in and gives you a loose, romantic wave.
For short hair, cut your T-shirt strips shorter and thinner than the tutorials show, and use more of them. This is a great one if you have zero tools and want to test whether you even like heatless curls before spending a dime.
8. Twist Curls
A close cousin of braid waves, but faster and with a different finish. Take a damp section, split it in two, twist each piece, then wind the two twists around each other into a rope. Pin the end. It gives you a spiral-ish wave that sits somewhere between a braid wave and a real curl.
Twists dry faster than braids because there is less overlapping hair, which makes them my pick when you want overnight-ish results but you are short on set time. Do several small twists for short hair rather than a couple of big ones.
9. Satin Scrunchie Curls (The Gentle Overnight Pick)
Newer, cozy, and genuinely kind to your hair. You wrap damp sections around a satin scrunchie, similar to the robe curl motion but on a smaller, softer loop, and let it set. The satin causes very little friction, so you get less frizz than you would with a hair tie.
This is a lovely low-tension option for anyone worried about breakage, because a soft scrunchie does not dig in the way a tight elastic or a hard roller can. For short hair, use mini scrunchies and place them higher up so your shorter lengths reach around them. The AAD’s everyday hair care guidance is a good reminder that gentler handling, including how you tie and secure hair, adds up to healthier strands over time, and heatless setting fits right into that gentler approach.
How to Adjust for Your Hair Type
This is where short-hair tutorials usually leave you hanging, so here is the honest breakdown.
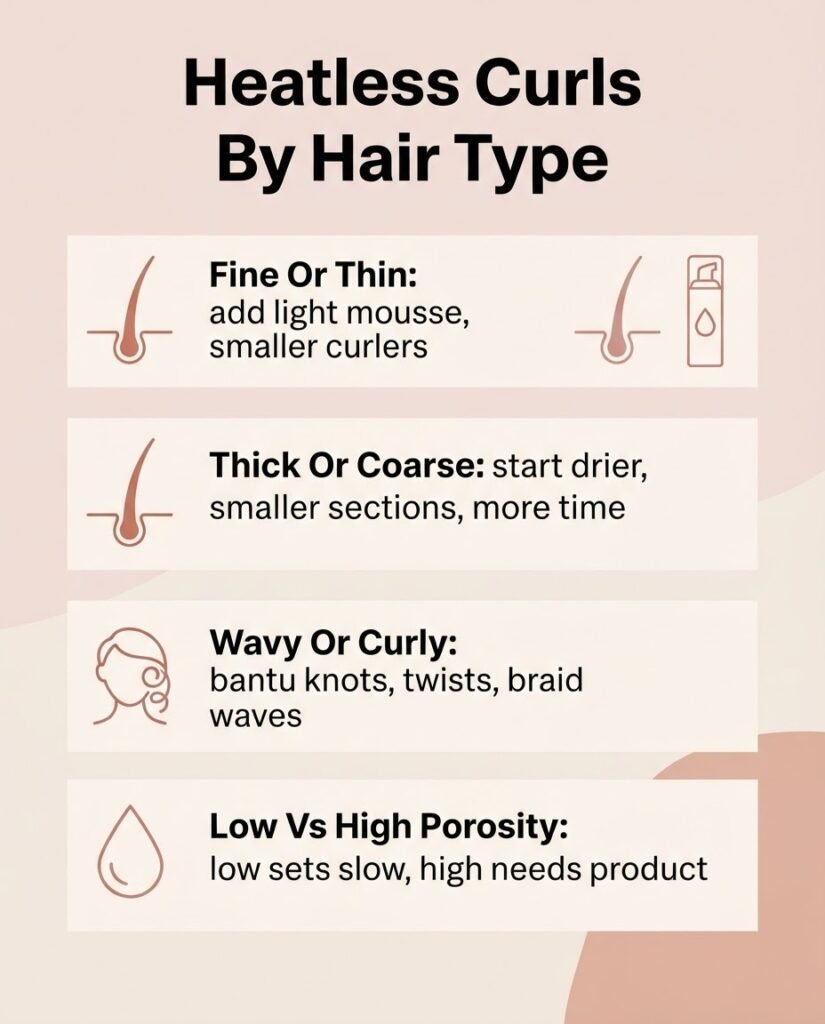
Fine or thin hair. Your challenge is hold, not the curl itself. Add a light mousse or styling cream to damp hair before you wrap, because fine hair is slippery and needs something to grip. Use smaller curlers and do not overload each section with too much hair. Set a flexible hairspray over the finished curls and try not to touch them for the first hour.
Thick or coarse hair. Your challenge is dry time. Thick hair holds a curl easily but takes forever to dry, so start with hair that is a touch drier, do smaller sections so air can get through, and give it real time. Overnight is your friend. A curl cream helps control the volume.
Already wavy or curly hair. You have a head start. Methods like bantu knots, twists, and braid waves work with your natural pattern instead of against it. Focus on definition and frizz control rather than forcing a brand-new shape.
Low-porosity hair. You resist water and dry slowly, so leave your set in longer than the tutorials say, and make sure it is fully dry before unwrapping.
High-porosity hair. You curl fast but drop fast, so lock it in with product and a satin cover overnight to hold the shape.
The Overnight Secret: Protect Your Set While You Sleep
If you go the overnight route, what your hair rubs against all night matters. Cotton pillowcases create friction that roughs up the cuticle and turns your neat curls into a frizzy cloud by morning.
Switching to satin or silk cuts that friction way down.

Silk is the pricier natural option, and as this Byrdie explainer on satin pillowcases points out, satin gives you a very similar smoothness benefit for a fraction of the cost, which makes it a genuinely great dupe. If you want the side-by-side, Dove has a straightforward satin versus silk comparison that breaks down the differences without the marketing fluff. A satin bonnet does the same job if you move around a lot in your sleep. This one small swap does more for your overnight curls than any expensive product.
Why Your Heatless Curls Keep Falling Out (And How to Fix It)
Let’s troubleshoot, because this is the real reason you are here.

They fell out within an hour. Your hair was too dry when you started, or you skipped product, or you unwrapped before it was fully set. Fix all three: start damp, add a little mousse or cream, and do not unwrap until it is bone dry.
They came out frizzy, not curly. Usually too much friction (cotton pillowcase, or you brushed them hard) or you took them down while still damp. Cover your set overnight, dry fully, and separate curls gently with your fingers, not a brush.
They were kinked and crimped instead of soft. Your rollers or wraps were too tight, or the fabric had a hard edge. Ease up on the tension and use soft, rounded curlers.
The rod or roller kept sliding off. Classic short-hair problem. Go smaller on your curler size, start the wrap closer to your scalp, and pin the ends. Big tools are made for long hair.
One side looks great, the other looks sad. Totally normal when you are learning, because your dominant hand is better at wrapping. Practice on the awkward side, or use a mirror setup so you can see the back. This gets better fast, I promise.
They dropped by afternoon even though they looked perfect at 8 a.m. This is often high-porosity hair or humidity. Add a stronger flexible hairspray, and on humid days, accept that a softer wave is more realistic than a tight curl. Working with your hair beats fighting it.
A Quick, Honest Word on Being Gentle
Heatless curls are genuinely one of the kindest things you can do for your hair, because you are skipping the heat that fries strands and causes breakage over time. That is a real win, especially for short hair you are trying to grow or repair.
That said, “heatless” does not automatically mean “risk free.” Wrapping too tightly, sleeping in hard curlers that dig into your scalp, or wearing tight braids and knots night after night can create tension that stresses your hair and scalp. Keep your wraps comfortable, give your hair rest days, and if you ever notice tenderness, thinning at your hairline, or an irritated scalp, that is worth a conversation with a dermatologist rather than pushing through. Gentle and consistent always beats aggressive and occasional.
You Can Absolutely Do This
Here is what I want you to take away. Short hair is not a barrier to heatless curls. It just needs smaller tools, damp not soaking hair, a little product for grip, and enough patience to let it dry all the way.
Pick one method that fits your length and vibe. If your hair is really short, start with pin curls or bantu knots. If you have a bob or lob, try flexi rods or braid waves first, because they are the most forgiving. Give it a couple of tries before you decide whether it is for you, because almost nobody nails it on attempt one, myself very much included.
Save this, try one tonight, and come back for the method that fits your hair best. Your soft, bouncy, no-heat curls are closer than you think.