12 Heatless Curl Methods That Actually Work Overnight
Let me guess. You saw someone on Pinterest wake up with soft, bouncy, “I definitely did not try” curls, you wrapped your hair around a robe tie before bed, and you woke up to a flat, creased situation that lasted about as long as your coffee. Been there. When I was a salon assistant in Austin, the number one heatless question I got was not “which method” but “why didn’t mine work.” So before I hand you the methods, I am going to tell you the one thing that changes everything, and then walk you through twelve ways to actually get there.
Heatless curls are my favorite kind of styling, and not just because they are gentle. They genuinely work if you understand what your hair is doing while you sleep. Once it clicks, you will stop guessing and start waking up to curls you actually want to keep.
First, the one thing nobody explains (and why yours keep failing)
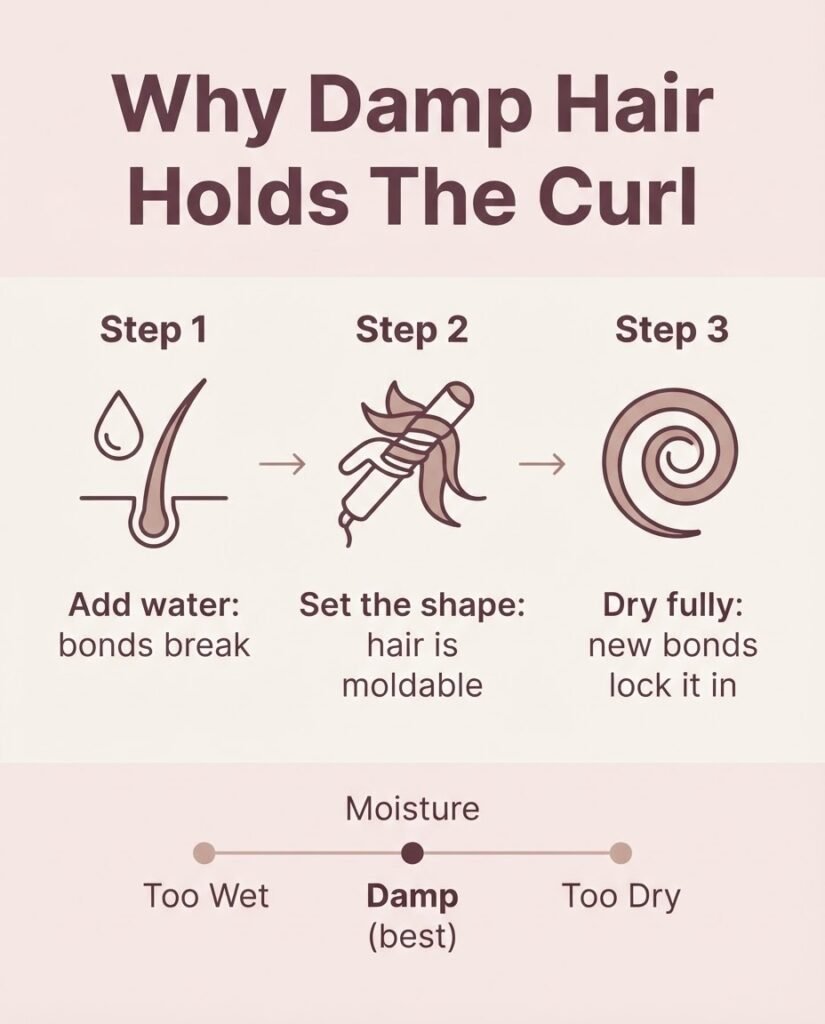
Here is the whole secret in one sentence. Your hair takes a temporary shape when it dries, so you have to set it while it is damp, not soaking, not bone dry.
Your hair is made mostly of a protein called keratin, and the temporary shape of a curl or a wave comes down to tiny connections called hydrogen bonds. When you add water, those bonds break and your hair goes floppy and moldable. When it dries in a new shape, brand new bonds form and lock that shape in. The cosmetic chemist behind Lab Muffin explains this hydrogen-bond process better than almost anyone, and it is the reason a wet-set curl holds while a dry wrap slides right out. If you want the textbook version, the University of Virginia chemistry department lays out how water and heat break those bonds and let new ones form as hair dries.
So what does “damp” actually mean? Think about 80 percent dry. Not dripping. Not fully dry. If you set soaking wet hair, it will not finish drying overnight and you will unwrap wet, limp pieces in the morning. If you set fully dry hair with no product, there is nothing for the shape to grab onto, so it falls out fast. The RobeCurls team, who basically kicked off the viral curling-headband trend, agree that damp setting gives the longest-lasting results. If your hair is already dry, just mist it with a spray bottle until it feels lightly damp, then go.
One more honest note before we start. Heatless is gentler than hot tools, and that is real. Blow-drying and irons pull moisture out of the hair and can rough up the cuticle over time, which is exactly why I lean heatless when I can. But gentle does not mean do anything you want. Wrapping hair painfully tight, night after night, puts tension on your roots, and dermatologists at the American Academy of Dermatology warn that consistently tight styles can lead to a type of hair loss called traction alopecia. So aim for secure, not scalp-screaming. If it hurts, loosen it.
What you need before you start
You do not need to buy anything to try this tonight. Most of these methods use things already in your house. But a few small tools make a real difference, and I will flag the honest dupes as we go.
The nice-to-haves are a spray bottle of water, a light styling product (a mousse, a curl cream, or a sea salt spray), a satin scrunchie or two, a claw clip, and a satin pillowcase or bonnet. Satin matters because it creates less friction against your hair than cotton, which means less frizz and fewer tangles by morning. A satin scrunchie or pillowcase is one of the cheapest upgrades in all of hair, usually just a few dollars, and it is genuinely worth it.
Now, the twelve methods. I have grouped them loosely from easiest to most involved, and I will tell you which hair types each one loves.
1. The robe curls method (the reliable one)
This is the method most people mean when they say “overnight heatless curls.” You take a long soft rod, drape it over your head like a headband, split your hair in two, and wrap each side around the rod, adding new hair as you go, then secure the ends.
You can buy a padded satin curling rod, often called a curling headband, for around 15 to 25 dollars, or you can do the original version for free with the tie from a bathrobe. The store-bought satin version slips less and is comfier to sleep on, but the robe tie genuinely works. The trick is wrapping smoothly and not too loose. Loose wraps make loose, sad waves.

Best for: most hair types, especially medium to long hair. If your hair is very fine, wrap in slightly smaller sections for more bounce.
2. The curling headband, criss-cross style
Same tool as robe curls, but instead of wrapping in one direction, you criss-cross the hair over and under the rod as you go down. This gives you a tighter, springier curl pattern instead of a loose wave. It is my pick when someone wants “curls” rather than “beachy waves.”
Best for: people who find plain robe curls come out too soft. The criss-cross adds structure, which fine and straight hair often needs.
3. Sock curls (the zero-dollar classic)
Grab a couple of clean, long socks. Split your hair, lay a sock along each section like a rod, and wrap or criss-cross your hair around it, then tie off the end. It is the exact same principle as a curling rod, just with something you already own.
In the Byrdie test I read, sock curls scored surprisingly high because they are soft to sleep on and easy to wrap. I love this one for beginners because there is zero pressure. You are experimenting with a sock. Nothing to lose.

Best for: all hair types, and anyone who wants to try the technique before buying a tool.
4. Heatless flexi rods
Flexi rods are bendy foam sticks. You wrap a section of damp hair around one, then fold the ends to lock it. The tighter and thinner the rod, the tighter the curl. These give you a more defined, ringlet-style curl than robe curls do.
A pack usually runs about 8 to 15 dollars. Fair warning, sleeping on a full head of rods takes some getting used to, so a lot of people do these for a few daytime hours instead of overnight if they are new to it.
Best for: people who want tighter, more uniform curls, and great for shorter hair that a big rod can’t grab.
5. The scrunchie method
Put your hair in a high ponytail using a scrunchie (a chunky satin one works best), then split the tail in two and weave each half in and out through the base of the scrunchie, working down, and secure the ends. In the morning you get big, bouncy, blowout-style curls concentrated through the mid-lengths and ends.
Best for: long, fine to medium hair. Thick hair may need to wrap around the scrunchie more than once to stay secure.
6. Twist and clip (the fastest one)
This is the lazy-genius method. Split damp hair down the middle, twist each side back and away from your face, and clip it up with a claw clip. That is it. It gives you a soft, natural bend and gorgeous face-framing pieces rather than full curls.
I reach for this one when I am short on time and just want my hair to look intentional. It dries fast and it is comfortable, though thick hair may still be a little damp by morning.
Best for: anyone wanting soft, undone waves, especially people with naturally wavy hair who just want more control.
7. Braid waves (one, two, or many)
Braids are heatless curling in its oldest form. One loose braid gives soft waves. Two braids give more defined S-waves. Lots of small braids give crimped, tight texture. Braid on damp hair, sleep on it, unravel gently in the morning, and finger-comb.
This is my personal comfort pick, because you can actually sleep well in braids, unlike some of the rod methods. Do not braid too tight at the scalp, both for comfort and for your roots.
Best for: every hair type. Adjust the number of braids for how much texture you want.
8. Twin twists (rope curls)
Take two sections, twist each one tightly on itself, then let the two twists wrap around each other into a rope, and secure. When you unwind it in the morning, you get spiral-ish waves. It is faster than braiding and gives a slightly more modern, piecey texture.
Best for: medium to long hair. Fine hair should twist tighter to hold.
9. Pin curls
The vintage method that never stopped working. Wrap a small section of damp hair around your finger into a flat coil against your head, then pin it in place. Do a whole head and you get tight, retro curls. Do larger sections for soft Hollywood waves.
Pin curls take patience and practice, so I will be honest, this is not the “five minutes before bed” option. But the payoff is beautiful, controlled curl, and it is featherlight to sleep on since there are no bulky rods.
Best for: people who want defined or vintage-style curls and do not mind a learning curve.
10. Bantu knots
Section your damp hair, twist each section, then coil it into a little knot against your scalp and secure it. Unravel in the morning for springy, defined curls. The bigger the sections, the looser the curl.
Best for: this method shines on thick, coily, and curly hair, and it works on other textures too. It can be a little bumpy to sleep on, so some people prefer to set them earlier and unravel before bed if the timing works.
11. The T-shirt (or headband) wrap
No rod? An old cotton t-shirt rolled into a rope works just like a robe tie. The headband version is even simpler. Put a soft stretchy headband on like you are about to wash your face, then tuck sections of damp hair up and around it all the way around your head. Unwrap in the morning for soft, romantic waves.
The headband method is the most beginner-proof thing on this list, but here is the honest catch, it needs product to hold. In testing, people who skipped product on the headband method got basically nothing. A little mousse or curl cream first makes all the difference.
Best for: beginners, and anyone who wants the lowest-effort setup. Best on medium to long hair.
12. Foam or satin rollers
Old-school rollers are still one of the most reliable ways to get uniform curls. Roll damp sections up toward the scalp, secure, and sleep. Foam rollers are soft enough to sleep on, and satin-covered ones cut down on frizz. Smaller rollers make tighter curls, larger ones make loose waves.
Best for: anyone who wants consistent, salon-looking curls and is willing to spend ten minutes rolling. Great for fine hair that struggles to hold, because you can control section size precisely.
How to make overnight curls actually last all day
Getting curls is half the battle. Keeping them is the other half, and this is where most people lose the game by noon.
Start with clean-ish hair, but not squeaky freshly washed. Day-one hair that is a little lived-in often holds shape better than slippery, just-shampooed strands. Speaking of washing, you do not need to lather daily. A peer-reviewed study on wash frequency found that satisfaction with hair and scalp condition was actually highest with regular washing for the participants studied, so this is about what suits your hair and scalp, not a rule to wash constantly. For heatless setting, day-two hair with a mist of water is often the sweet spot.
Always use a light product on damp hair before you set. Mousse, sea salt spray, a flexible setting lotion, or a little curl cream all give your hair something to hold the shape with. Skip heavy oils before setting, they weigh curls down and keep hair from locking in.
Make sure your hair is genuinely dry before you take the set out. If you unwrap and it is even slightly damp, the curl is not set and it will drop within the hour. If you are a fast-morning person, set your hair earlier in the evening, or gently blast the wrapped set with cool air from a dryer to speed drying without adding heat damage.
When you unwrap, do not brush. Finger-comb or use a wide-tooth comb, and let the curls separate. A tiny bit of hairspray or a light texture spray after locks things in.

For overnight friction, a satin pillowcase or bonnet keeps your set from getting fuzzed up while you toss and turn.
Fixing the most common beginner problems
My curls fell out by lunch. Almost always a damp problem. Your hair was too wet to fully dry, or too dry to grab the shape. Aim for that 80 percent dry, damp-not-wet zone, and add product.
My curls came out frizzy. Two usual causes. You brushed them out (finger-comb instead), or there was too much friction overnight (switch to satin). A rough cuticle also frizzes more, so keep hair conditioned.
They’re way too tight and “Shirley Temple.” Use bigger sections and a larger rod or looser braids. Tight sections equal tight curls. You can also loosen the whole look by gently raking product through with your fingers.
One side looks better than the other. Totally normal, especially at first. Wrapping symmetrically takes practice. In the salon I watched stylists build this muscle memory over months, so give yourself a few tries before you judge your skills.
It hurts or I can’t sleep in it. Loosen it. A set that keeps you up all night is not worth it, and painfully tight styles are not good for your roots long term. The AAD’s guidance on gentler styling, including letting hair air dry and avoiding constant tension, applies here too. Try braids or pin curls, which are much easier to sleep on than bulky rods.
Matching the method to your hair
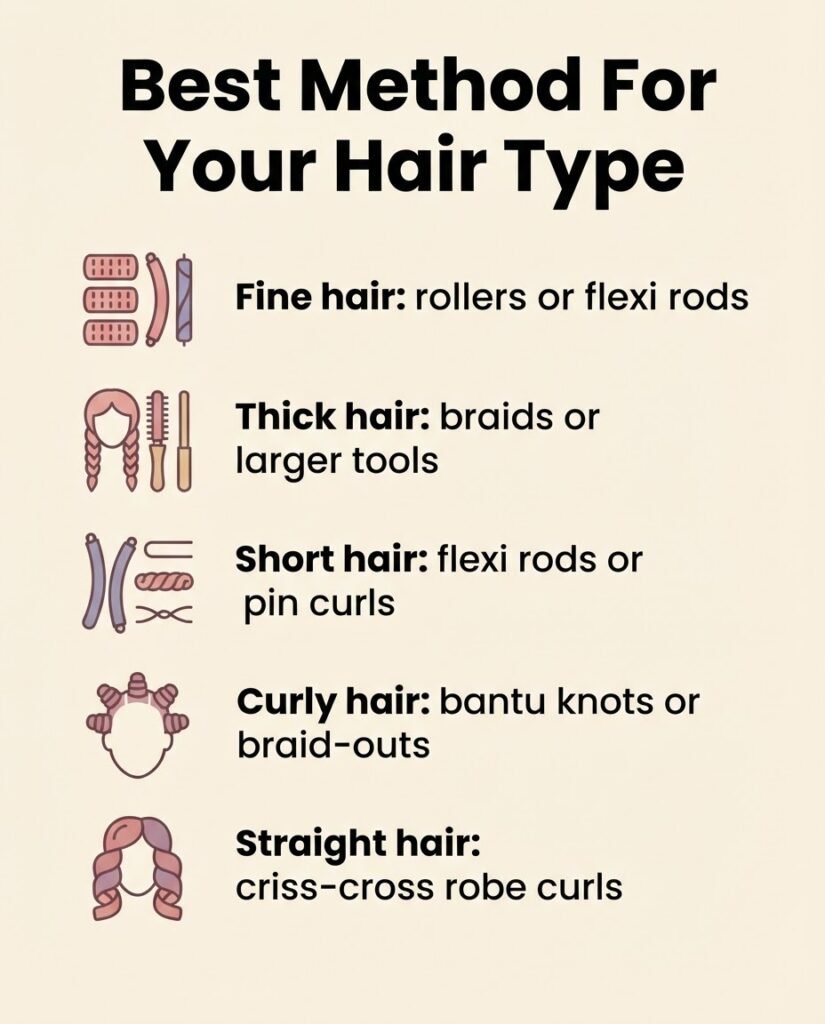
If your hair is fine or won’t hold curl, go for smaller sections, use rollers or flexi rods for structure, and never skip product. Fine hair holds shape best when there is something to grip.
If your hair is thick, give yourself more time and use larger tools or more braids and twists, since thick hair takes longer to dry. Set earlier in the evening so it is fully dry by morning.
If your hair is short, robe rods can struggle to grab everything, so flexi rods, small rollers, or pin curls will serve you better.
If your hair is curly or coily, bantu knots and braid-outs are your best friends, and they double as gentle definition rather than fighting your natural pattern.
If your hair is straight and resistant, this is where damp setting and product matter most. Straight hair loves to snap back to straight, so criss-cross robe curls, flexi rods, or rollers with a setting spray will hold better than a loose single braid.
Here is the thing I want you to walk away with. You are not bad at this, you were probably just working with hair that was too wet or too dry, with nothing to hold the shape. Fix that one variable and you will surprise yourself. Pick one method tonight, keep your expectations kind, and treat the first few tries as practice, not proof. You have got this, and your hair will thank you for skipping the heat.